While logged into your account, click on the My Information link, under the My Account Settings menu:

On the My Information page, you can edit the details of your account:
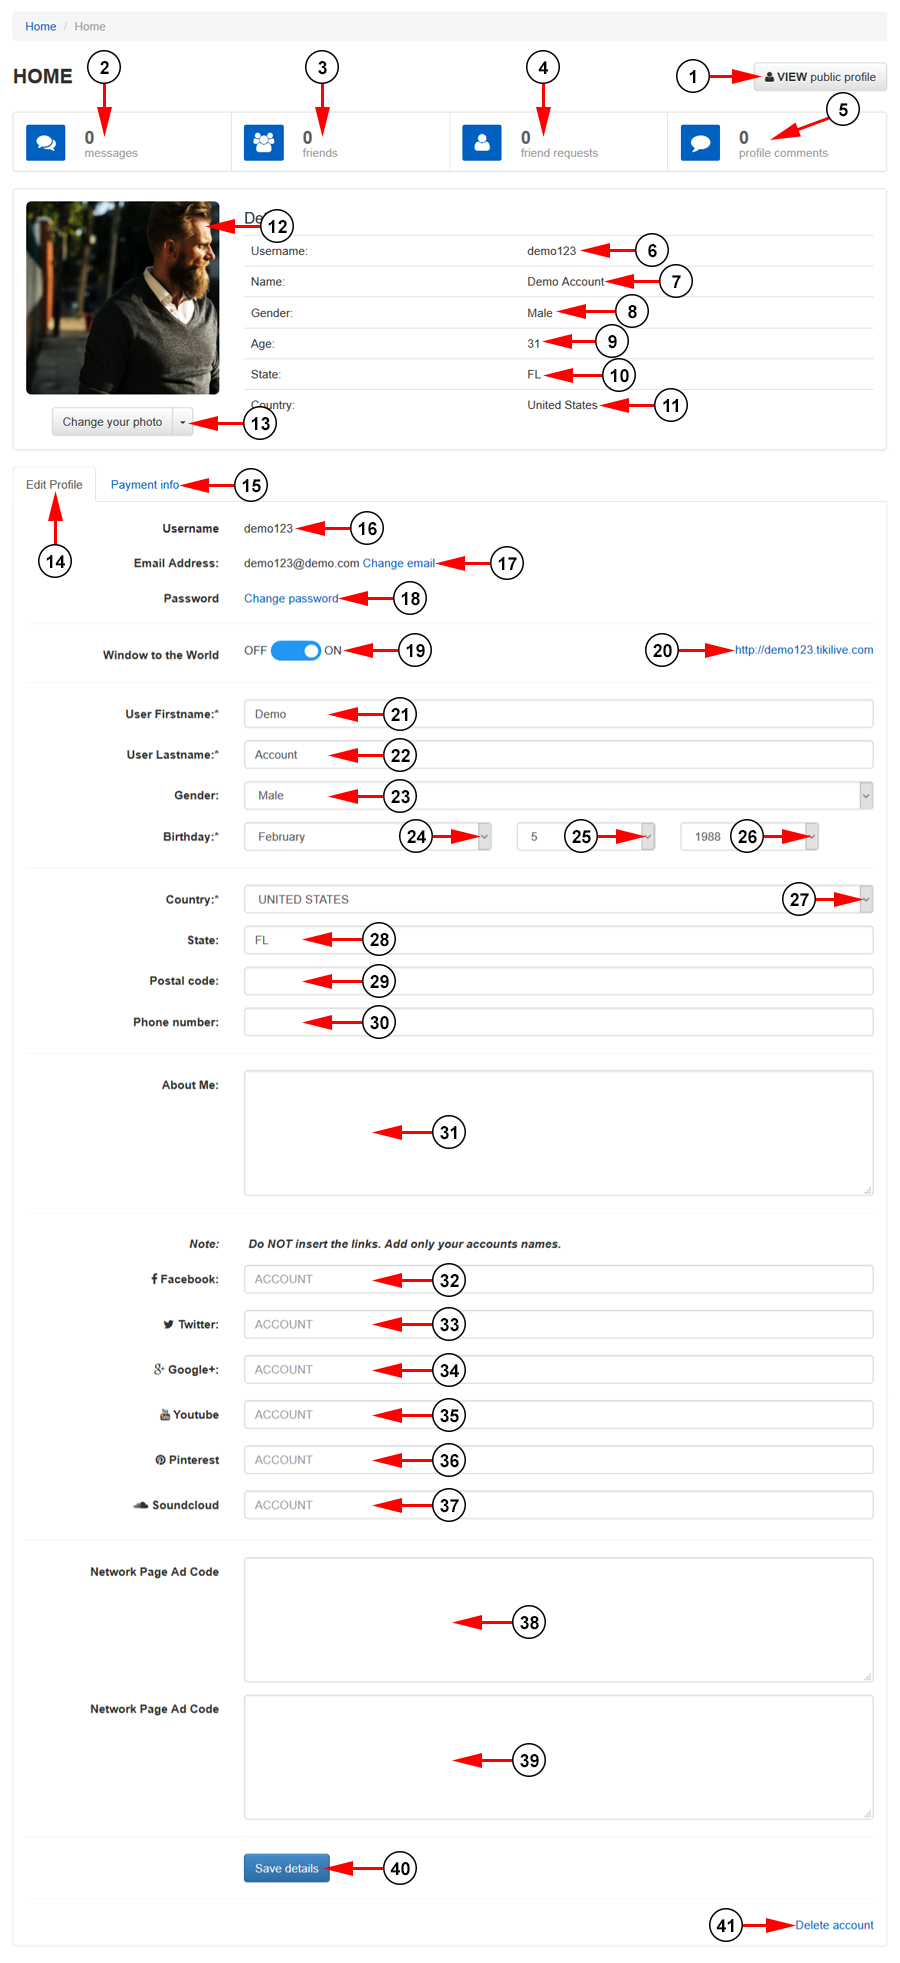
1. Click here to view your Network page on the website.
2. Here you can see the number of messages received. Click to navigate to the messages page.
3. Here you can see the number of friends you have. Click to navigate to the friends page.
4. Here you can see the number of friend requests received. Click to navigate to the friends requests page.
5. Here you can see the number of comments received. Click to navigate to the comments section of your Network page.
6. Here you can see the username you inserted at registration.
7. Here you can see the name you inserted at registration.
8. Here you can see the gender you selected at registration.
9. Here you can see the age you inserted at registration.
10. Here you can see the state you selected at registration.
11. Here you can see the country you selected at registration.
12. Here you can see your profile image.
13. Click here to change your account photo. You can select a photo from your computer or reset it to the default.
Note: you can upload a PNG or JPG image, having minimum dimensions of 270 x 270 pixels, aspect ratio.
14. Click here to view your profile details.
15. Click here to view the payment info page.
16. Here you can view your username.
17. Click here to change your email address. A new field will be displayed and you can insert a new email address.
Note: If you change the email address, your account will be deactivated until the new email address is confirmed. You will need to click on the activation link that the system will send to your new email address.
18. Click here to change your account password. A new field will be displayed and you can insert a new password.
Note: When the user or even the administrator changes the account password, the user will be logged out of the platform (on all computers and browsers) and required to log in again.
19. Toggle the switch here to enable or disable your Network page.
20. Here you can see the subdomain for your network page. Click the link to be redirected to your Network page.
21. Here you can view and edit your first name.
22. Here you can view and edit your last name.
23. Here you can view and edit your gender.
24. Click here to select your birthday month.
25. Click here to select your birthday day.
26. Click here to select your birthday year.
27. Click here to select a country.
28. Here you can view and edit the state where you live.
29. Here you can view and edit the postal code of the area.
30. Here you can view and edit your phone number (this is automatically saved and updated when you are making a payment using Credit Card form).
31. Here you can view and edit your profile description.
32. Insert here your Facebook account name. This can be a profile, group, or page.
Note: you need to insert only the name or ID that is displayed after https://www.facebook.com/.
For example:
Facebook URL – https://www.facebook.com/tikilive
Account name that needs to be inserted in Profile page is: tikilive
33. Insert here your Twitter account handle.
Note: you need to insert only the name or ID that is displayed after https://www.twitter.com/.
For example:
Twitter URL – https://www.twitter.com/tikilive
Account name that needs to be inserted in Profile page is: tikilive
34. Insert here your Google plus account code.
Note: you need to insert only the code that is displayed after https://plus.google.com/.
For example:
Google URL – https://plus.google.com/u/0/101217209355189189900/posts
Account code that needs to be inserted in Profile page is: u/0/101217209355189189900/posts
35. Insert here your YouTube account code.
Note: you need to insert only the code that is displayed after https://www.youtube.com/.
For example:
YouTube URL – https://www.youtube.com/user/tikilive
Account code that needs to be inserted in Profile page is: tikilive
36. Insert here your Soundcloud account code.
Note: you need to insert only the code that is displayed after https://www.soundcloud.com/.
For example:
Soundcloud URL – https://www.soundcloud.com/tikilive/
Account code that needs to be inserted in Profile page is: tikilive
37. Insert here your Pinterest account code.
Note: you need to insert only the code that is displayed after https://www.pinterest.com/tikilive/.
For example:
Pinterest URL – https://www.pinterest.com/tikilive/
Account code that needs to be inserted in Profile page is: tikilive
38. Enter here your Google Ad Sense code if you have one. This will be displayed at the top of the page next to your featured player on your Network page.
39. Enter here your Google Ad Sense code if you have one. This will be displayed below your channels and videos on your Network page.
40. Click the button here to save your changes.
41. Click here to delete your account.
Note: Once you delete your account you will not be able to use it again.
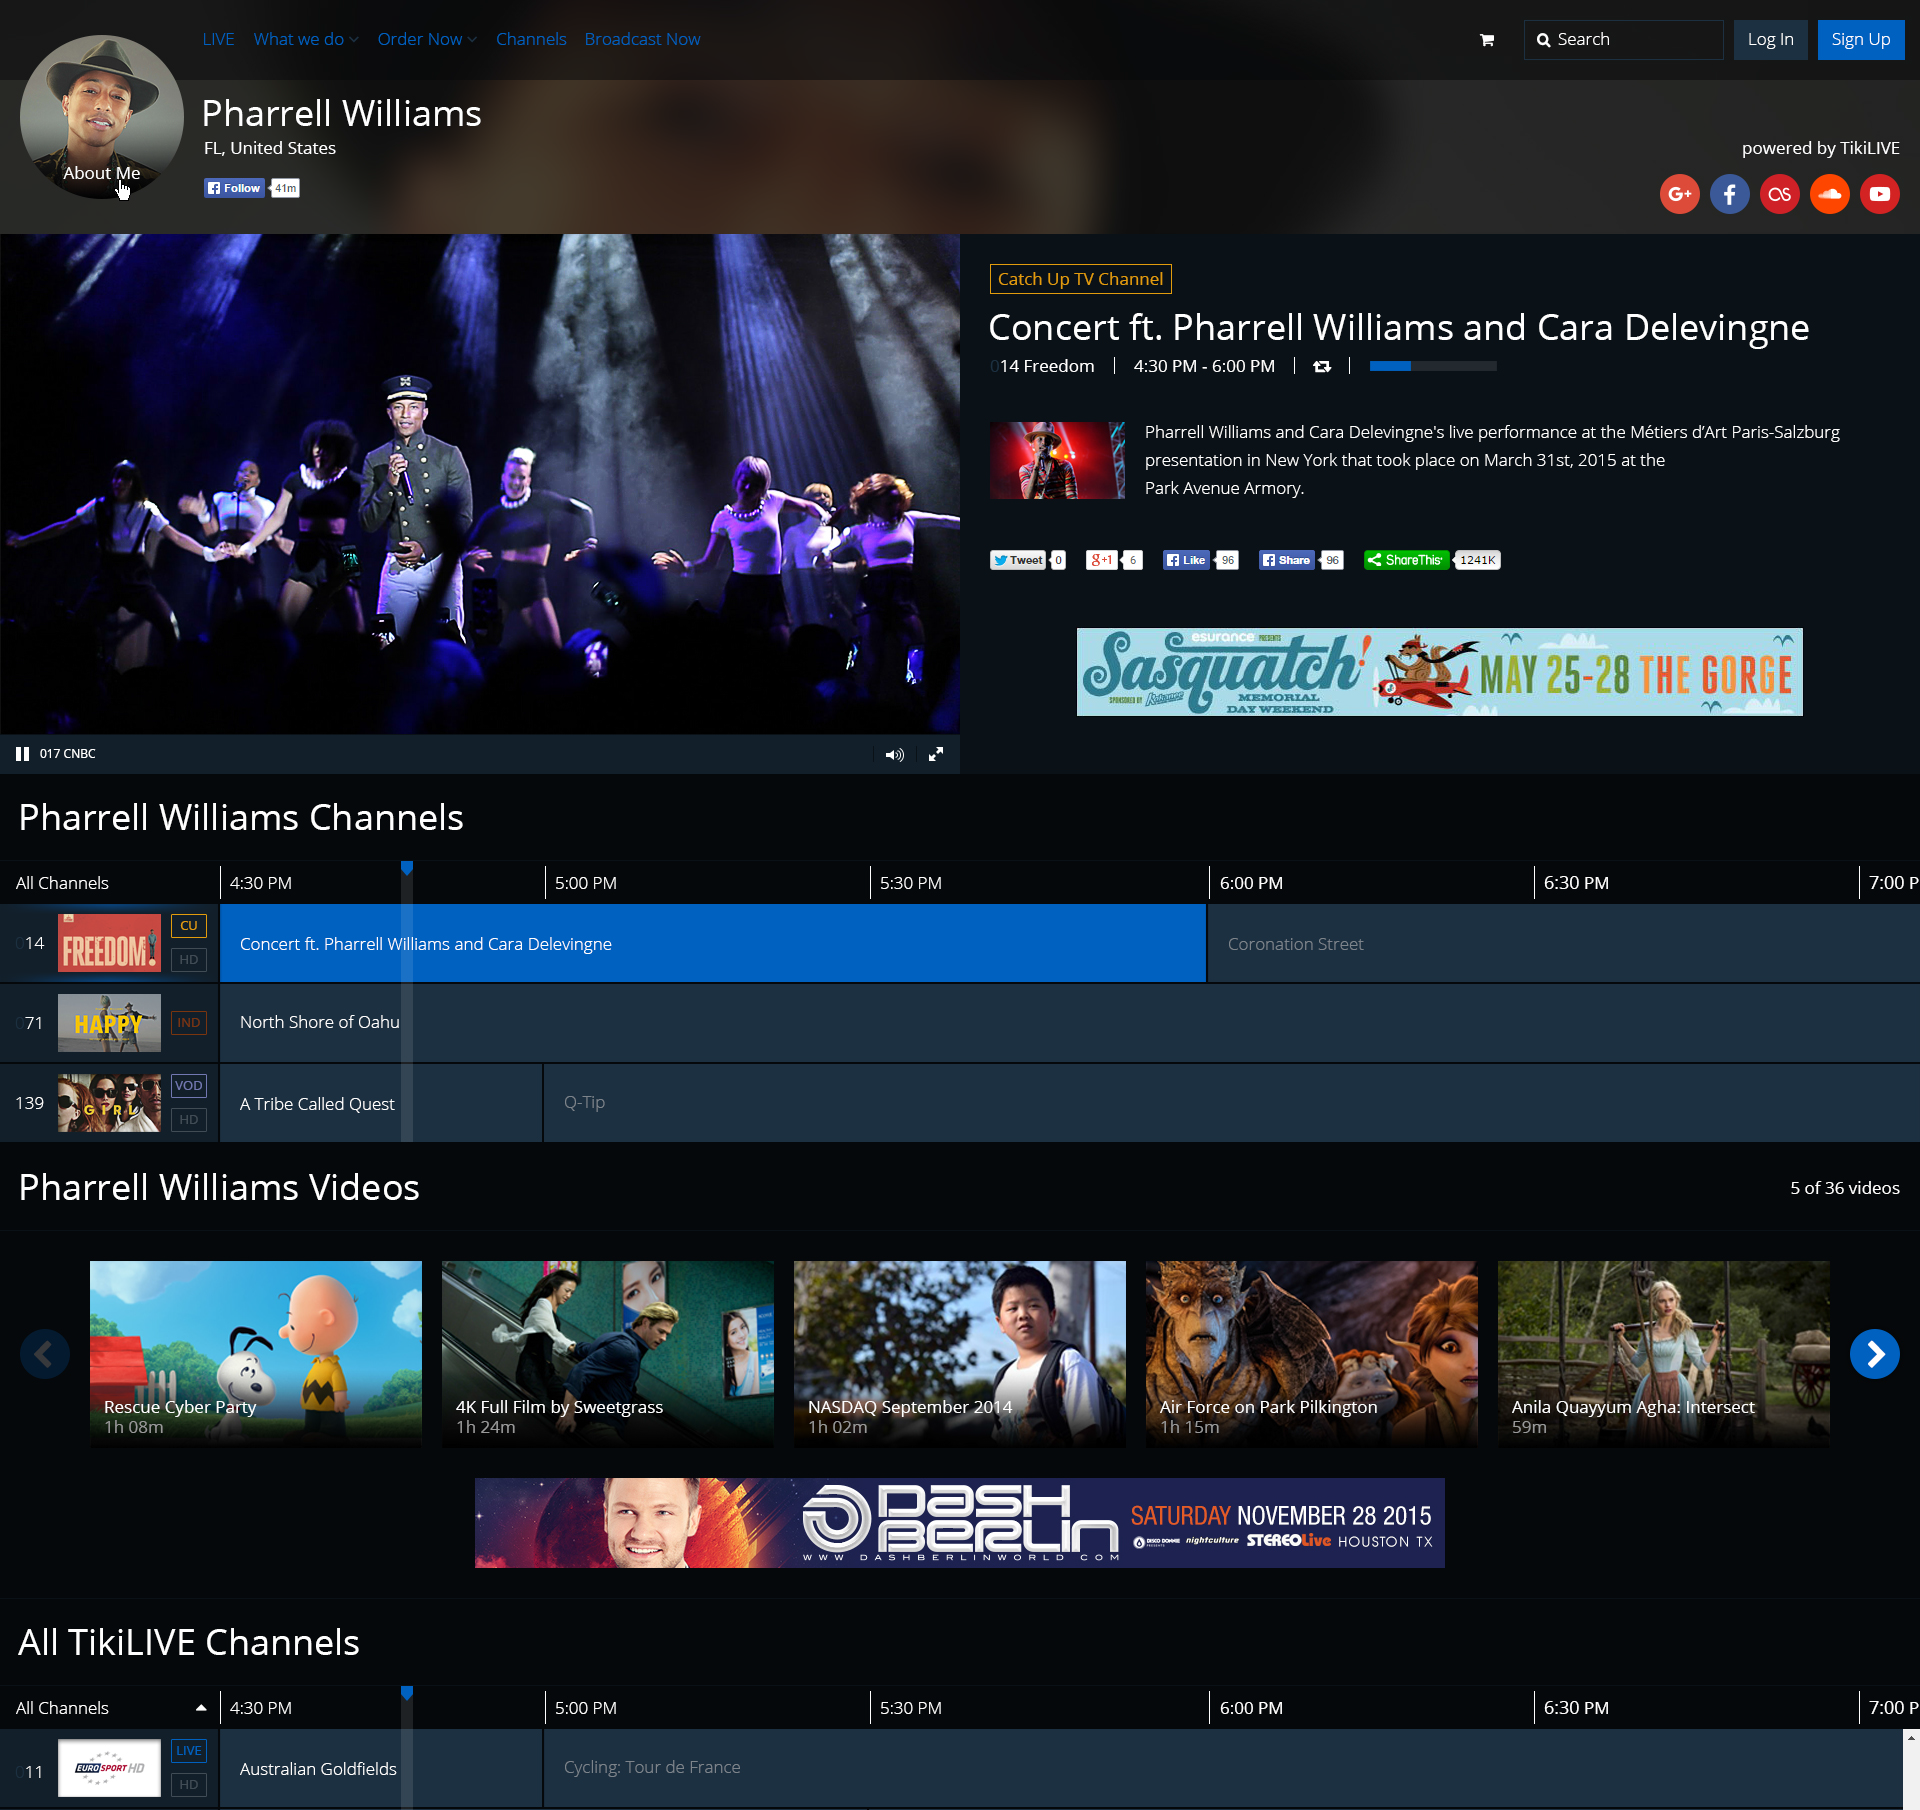
This is how the Ads are displayed on the network page: