Widgets can be activated by simply dragging them and dropping on the desired area: main sidebar, home page sidebar or home page content. Once the widgets are dropped they are activated. You can also adjust the settings of some widgets from the drop down menu.
Important: depending on the selected theme, the number of available widgets can differ. Some widgets are available only on some WordPress themes.
In this page we exemplified how widgets can be configured and how they are displayed on the web blog:
- AddThis Share
- Akismet
- Appointments + Monthly Calendar
- Appointments + Service Providers
- Appointments + Services
- Archives
- Audio
- Banner
- Categories
- Category Posts
- Channels
- Custom HTML
- Events Calendar
- Facebook Fan Box
- Featured Channels
- Featured Radio Channels
- Featured Slider
- Featured Video
- Gallery
- Home Page Box
- Image
- Latest Category Post
- Navigation Menu
- NextGEN Media RSS
- NextGEN Slideshow
- NextGEN
- Pages
- Product Categories
- Product List
- Product Tag Cloud
- Recent Comments
- Recent Posts
- RSS Feed
- Search
- Shopping Cart
- Tag Cloud
- Text
- Upcoming Days Events
- Video
- Video Highlight
- Videos
- WP-Forecast
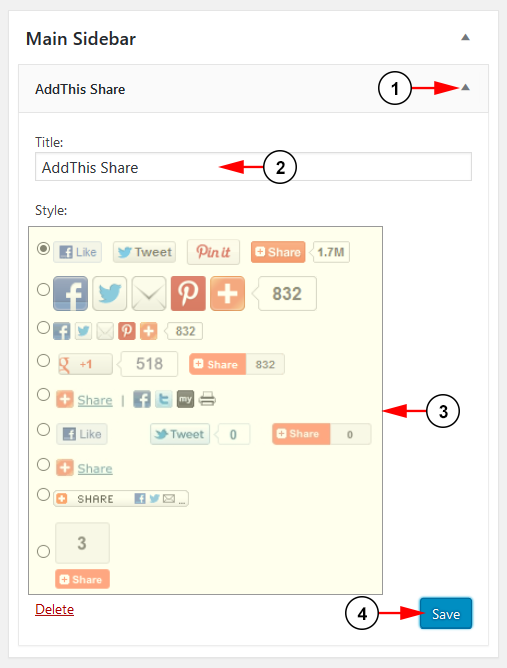
1. AddThis Share
The AddThis Share widget displays a set of social media button for visitors to share your site:
1. Click on the drop down to open the menu.
2. Here you can insert a title for your widget.
3. Click a radio button to choose your icon style.
4. Click here to save the details.
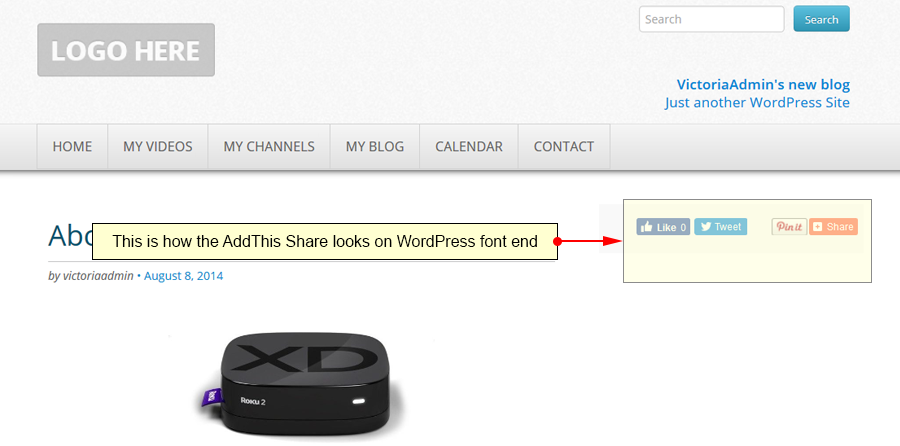
This is how the AddThis Share widget is displayed on your site:
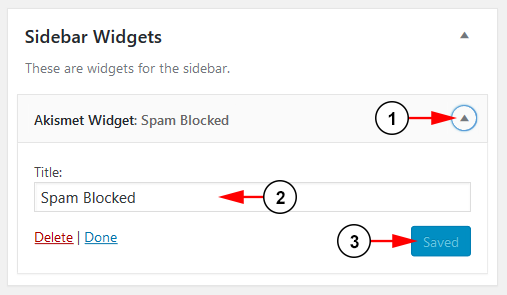
2. Akismet
The Akismet widget shows the amount of spam that has been blocked from your site:
1. Click on the drop down to open the menu.
2. Here you can insert a title for your widget.
3. Click here to save the details.
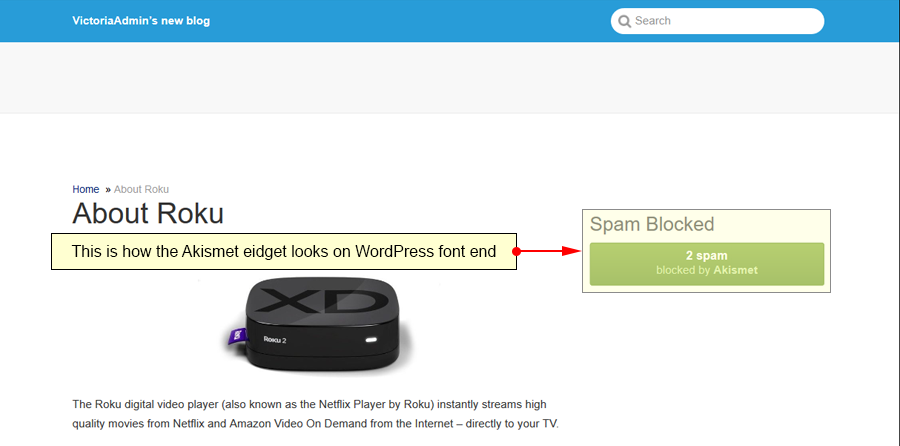
This is how the Akismet widget is displayed on your site:
3. Appointments + Monthly Calendar
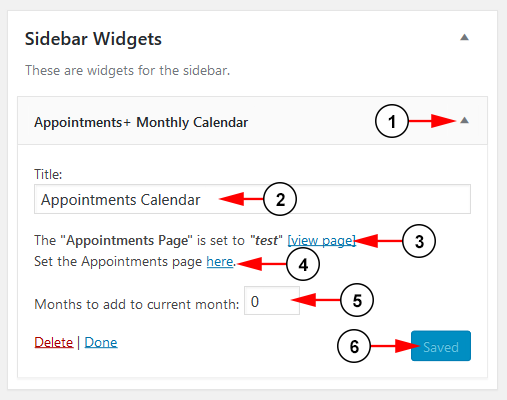
The Appointments + Monthly Calendar widget displays a calendar for your appointments on your site:
1. Click on the drop down to open the menu.
2. Here you can insert a title for your widget.
3. Here you can see your set page for your appointments and have the option to view it.
4. Click the link here to set the Appointments page in the settings.
5. Type a number here to offset the calendar month that is shown on your site.
6. Click here to save the details.
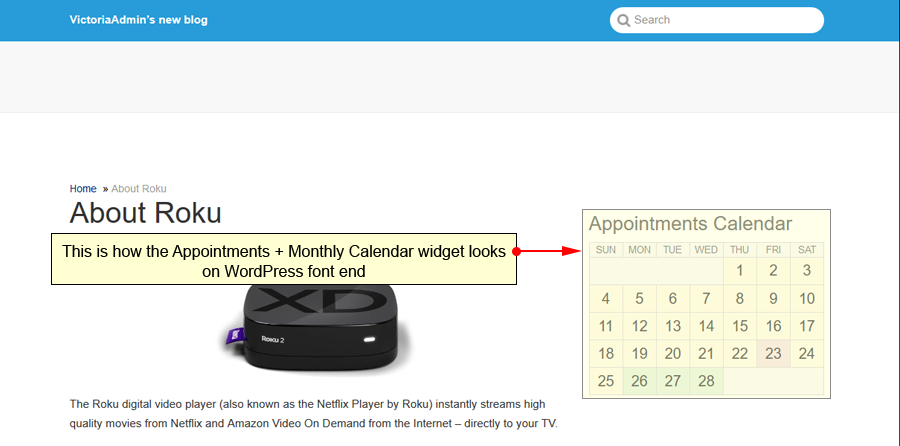
This is how the Appointments + Monthly Calendar widget is displayed on your site:
4. Appointments + Service Providers
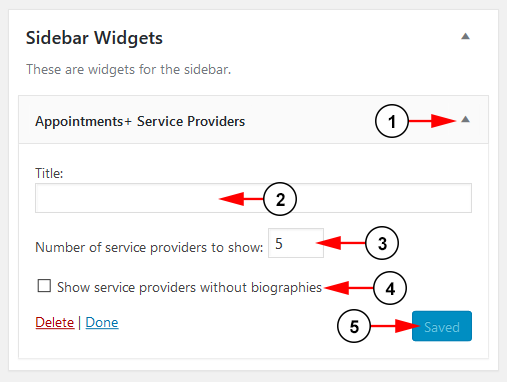
The Appointments + Service Providers widget lists users on your site who can provide services through the Appointments plugin:
1. Click on the drop down to open the menu.
2. Here you can insert a title for your widget.
3. Here you can set limit to the number of providers listed in the widget.
4. Check this box if you want to show service providers without biographies.
5. Click here to save the details.
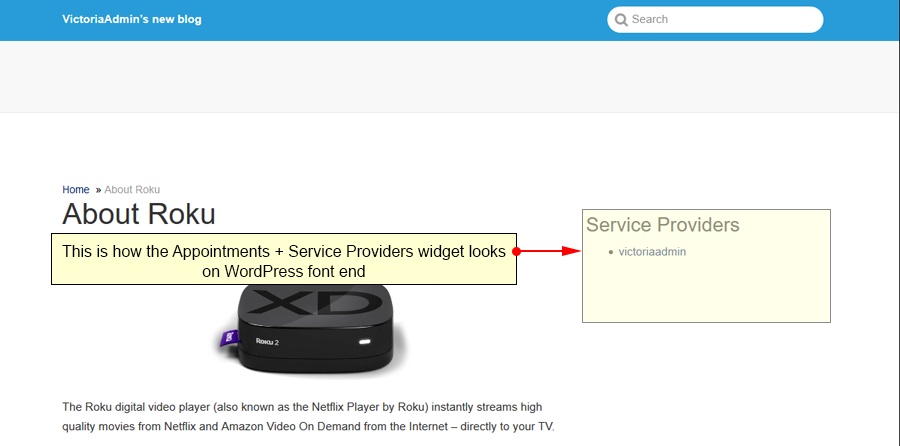
This is how the Appointments + Service Providers widget is displayed on your site:
5. Appointments + Services
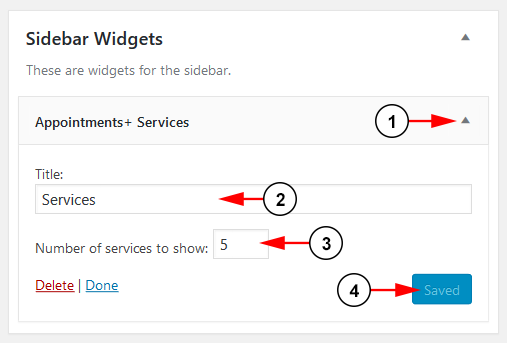
The Appointments + Services widget lists the different offered services on your site:
1. Click on the drop down to open the menu.
2. Here you can insert a title for your widget.
3. Here you can set limit to the number of services listed in the widget.
4. Click here to save the details.
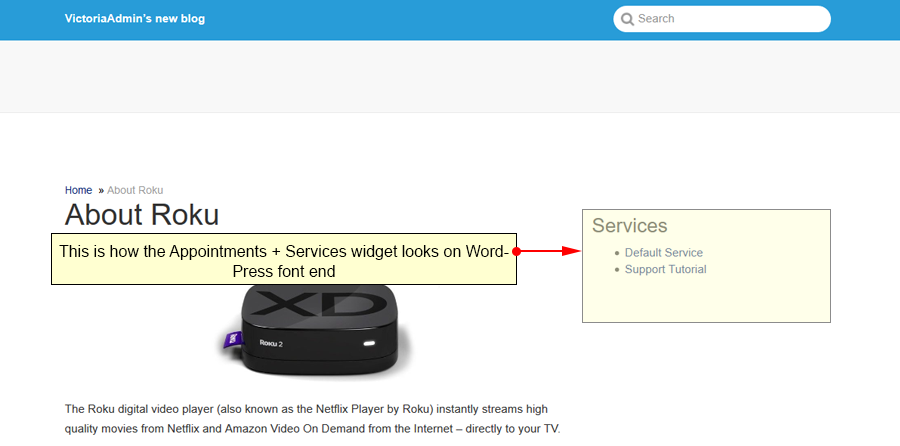
This is how the Appointments + Services widget is displayed on your site:
6. Archives
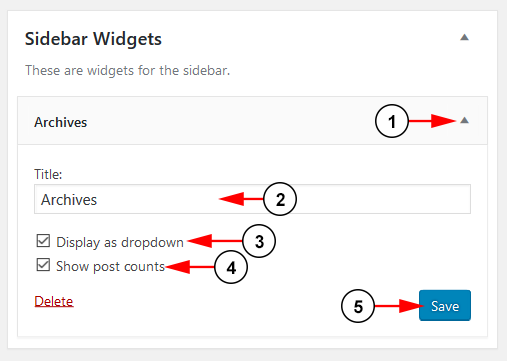
The Archives widget organizes your previously published posts by month. This can be handy for readers who want to browse your older content:
1. Click on the drop down to open the menu.
2. Here you can insert a title for your widget.
3. Check this box if you want the Archives to be displayed as a drop down list.
4. Check this box if you want to show the post counts.
5. Click here to save the details.
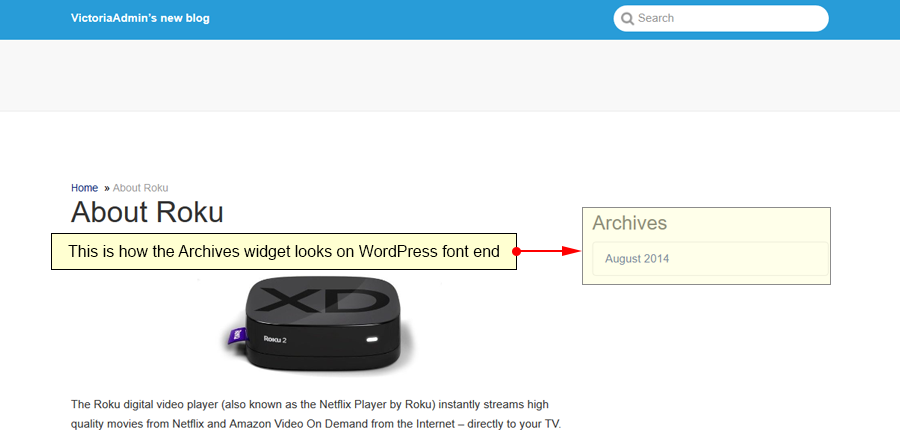
This is how the Archives widget is displayed on your site:
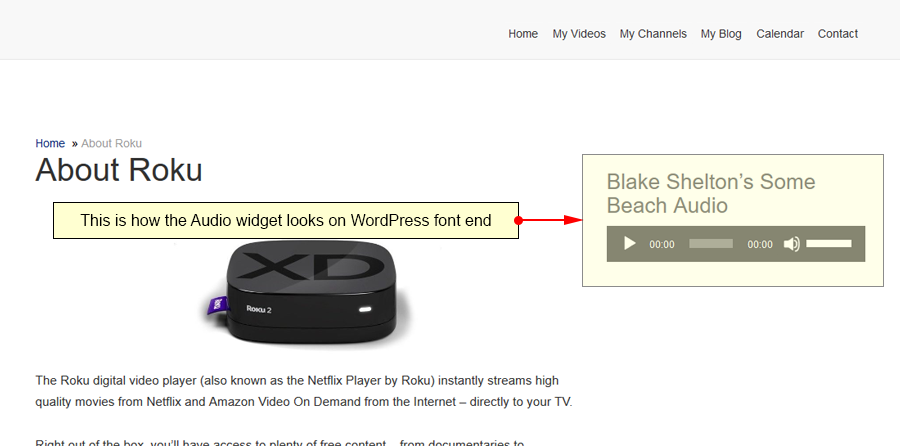
7. Audio
The Audio widget displays an audio player for what audio files you have uploaded and selected:
1. Click on the drop down to open the menu.
2. Here you can insert a title for your widget.
3. Click the button here to edit the audio meta data.
4. Click the button here to replace the audio files selected.
5. Click here to save the details.
This is how the Audio widget is displayed on your site:
8. Banner
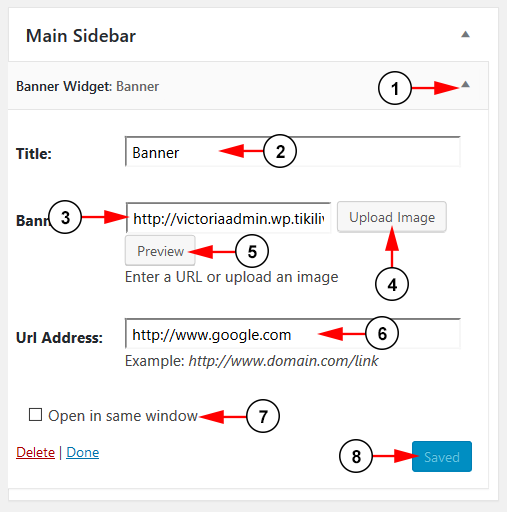
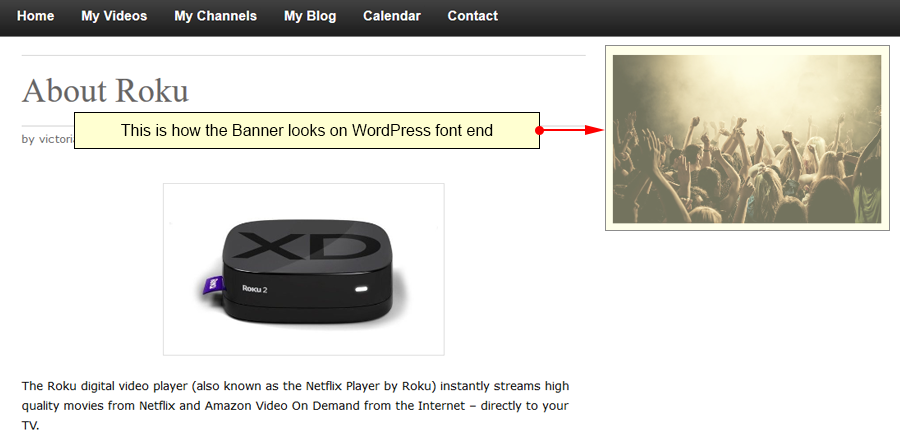
The Banner widget displays an image on your site:
1. Click on the drop down to open the menu.
2. Here you can insert a title for your widget.
3. Insert an image URL here.
4. Click here to up upload an image.
5. Click here to preview the chosen image.
6. Insert here the link to attach to your image here.
7. Click here for the link to be opened in the same window.
8. Click here to save the details.
This is how the Banner widget is displayed on your site:
9. Categories
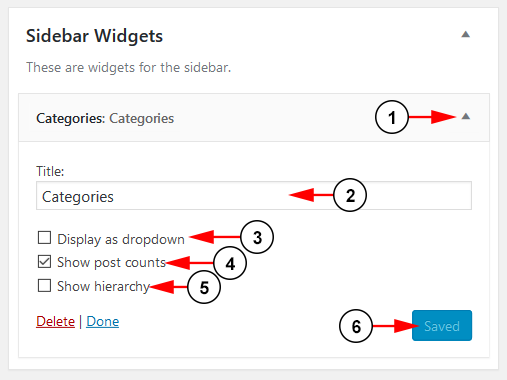
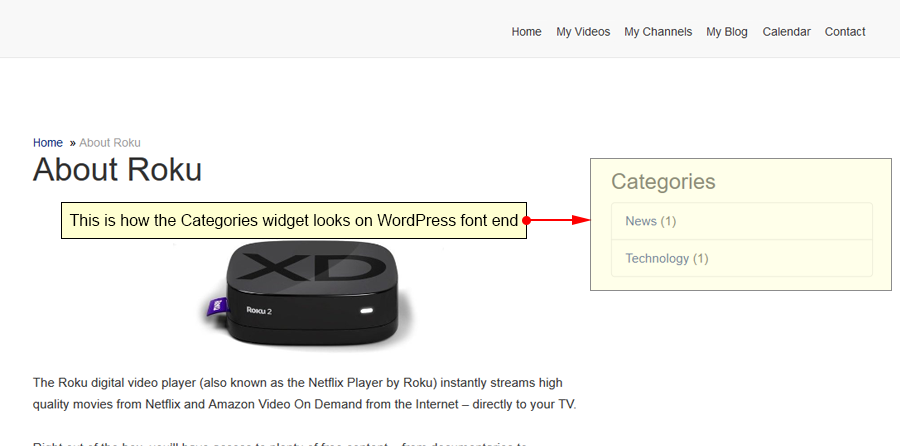
The Categories widget displays list or dropdown of the page/post categories on your site:
1. Click on the drop down to open the menu.
2. Here you can insert a title for your widget.
3. Check the radio button to display the list as a dropdown.
4. Check the radio button to show the posts count.
5. Check the radio button here to show hierarchy.
6. Click here to save the details.
This is how the Categories widget is displayed on your site:
10. Latest Category Posts
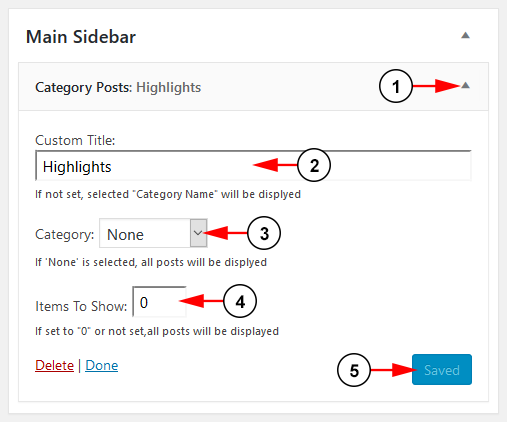
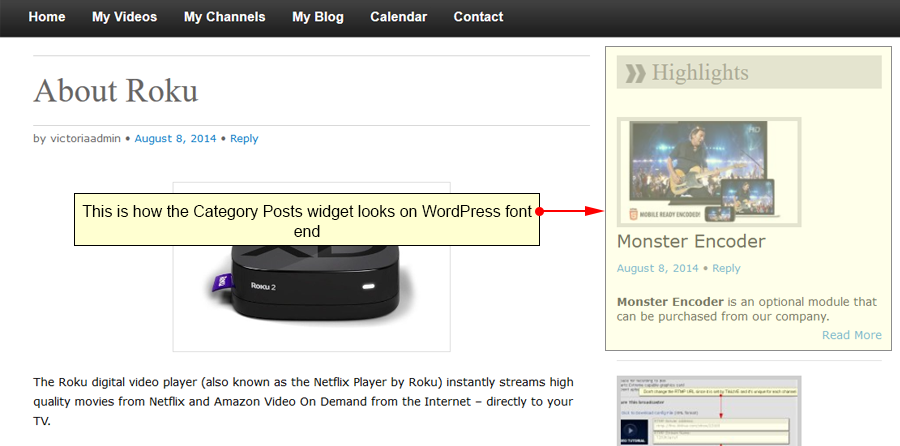
The Category Posts widget displays a list of posts from a specific category on your site:
1. Click on the drop down to open the menu.
2. Here you can insert a title for your widget.
3. Choose from the drop down list the category you wish to use.
4. Insert a number here to limit the number of posts shown.
5. Click here to save the details.
This is how the Latest Category Posts widget is displayed on your site:
11. Channels
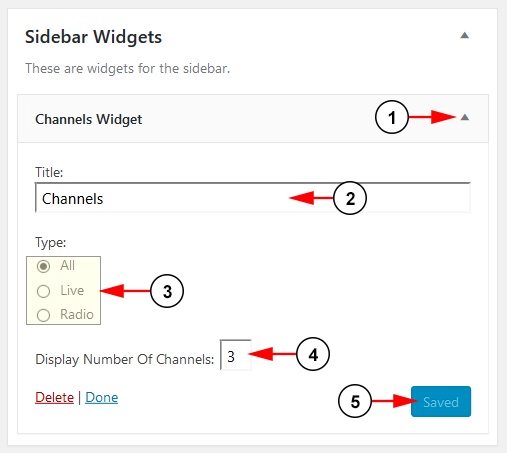
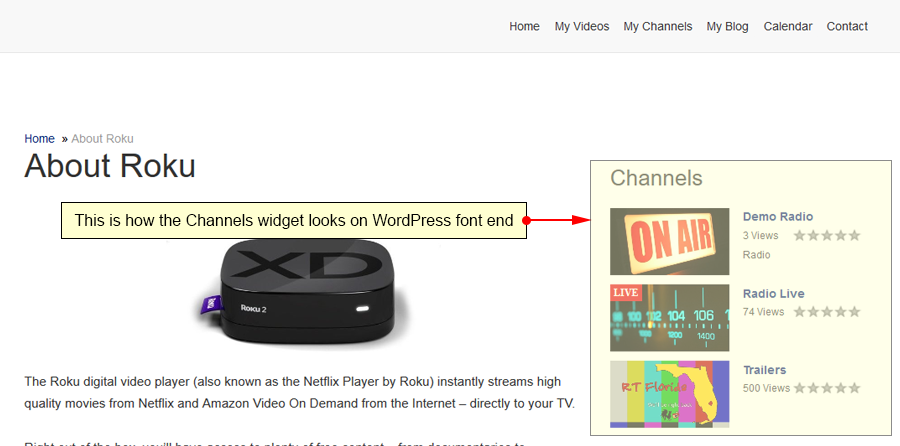
The Channels widget displays the latest channels on your site:
1. Click on the drop down to open the menu.
2. Here you can insert a title for your widget.
3. Choose why types of channels you want to display on the widget; All, Live, or Radio.
4. Here you can limit the max amount of channels that are displayed.
5. Click here to save the details.
This is how the Channels widget is displayed on your site:
12. Custom HTML
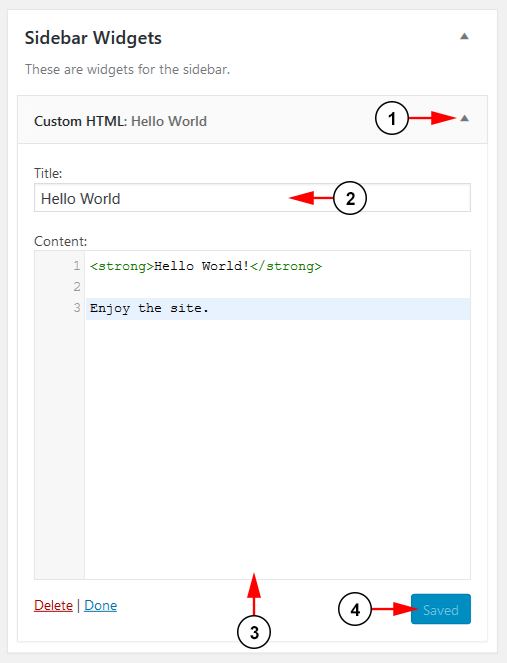
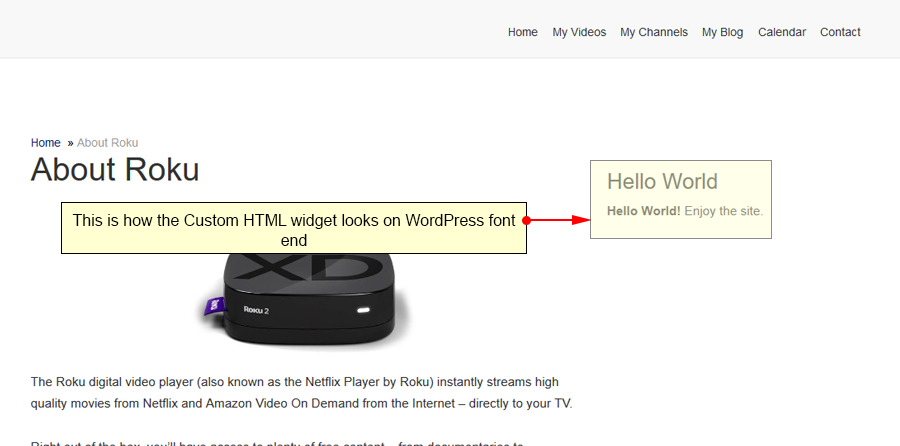
The Custom HTML widget allows you to input arbitrary HTML code to display on the widget:
1. Click on the drop down to open the menu.
2. Here you can insert a title for your widget.
3. Insert your HTML text here.
4. Click here to save the details.
This is how the Custom HTML widget is displayed on your site:
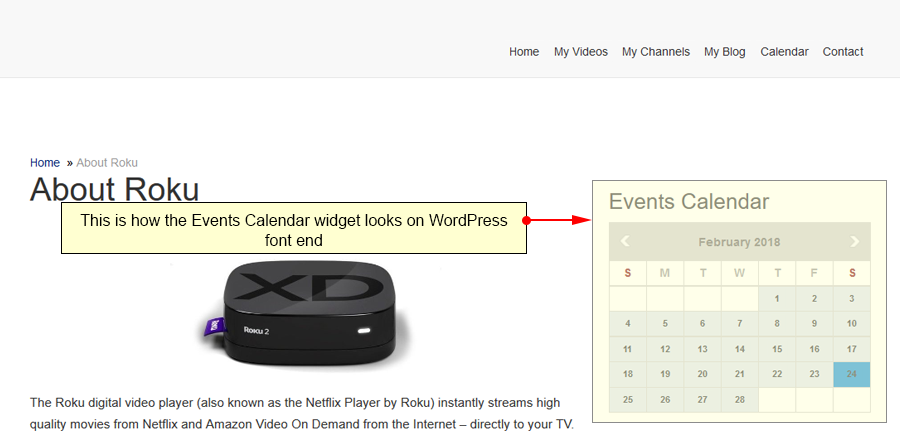
13. Events Calendar
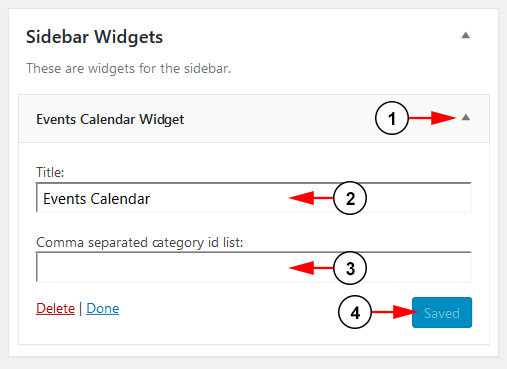
Events Calendar widget displays an events calendar for your site:
1. Click on the drop down to open the menu.
2. Here you can insert a title for your widget.
3. Insert here the ID of the category from Manage Categories page. You can insert multiple IDs separated by commas.
4. Click here to save the details.
This is how the Events Calendar is displayed on the Home page sidebar of the web blog:
When you hover the mouse over a day, the events that take place in that day will be displayed.
Note: the number of events depends on how many category IDs you inserted.
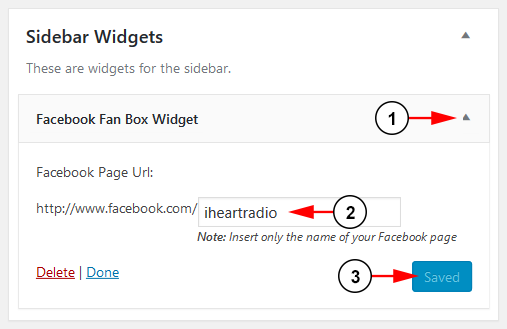
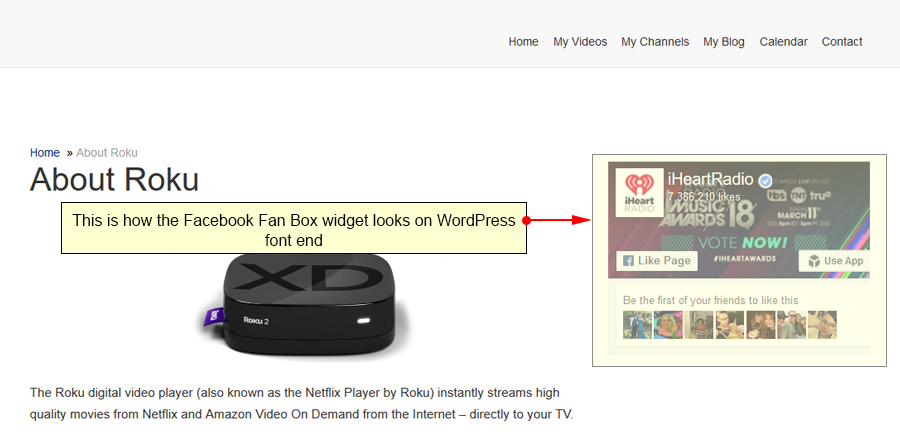
14. Facebook Fan Box
The Facebook Fan Box widget display a Facebook Fan Box so viewers can like your Facebook page and click to visit it:
1. Click on the drop down to open the menu.
2. Insert the name of your Facebook page here. This can be found in your URL link.
3. Click here to save the details.
This is how the Facebook Fan Box widget is displayed on your site:
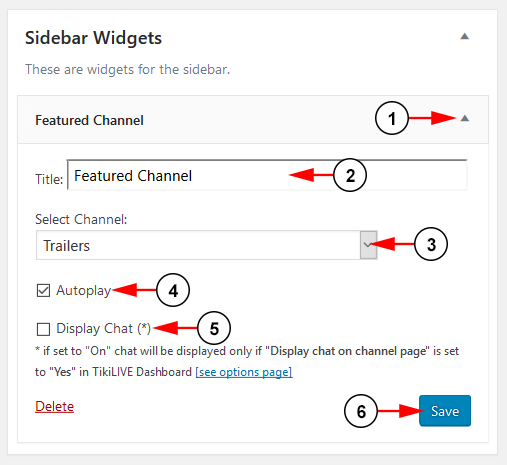
15. Featured Channel
The Featured Channel widget displays a selected video channel on your site through the widget:
1. Click on the drop down to open the menu.
2. Here you can insert a title for your widget.
3. Choose from the drop down list the channel you want to display on your site.
4. Check this box to have your channel autoplay.
5. Check this box to display the chat for your channel.
Note: This feature will only display if the “Display chat on channel page” section is set for your channel settings.
6. Click here to save the details.
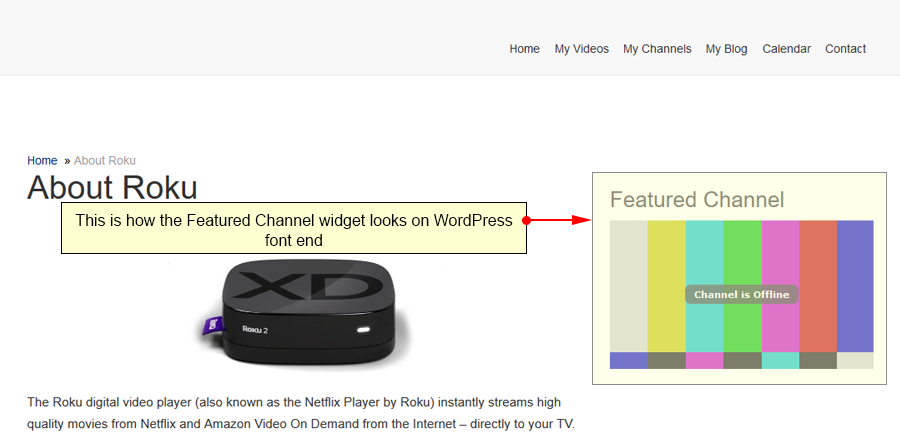
This is how the Featured Channel widget is displayed on your site:
16. Featured Radio Channel
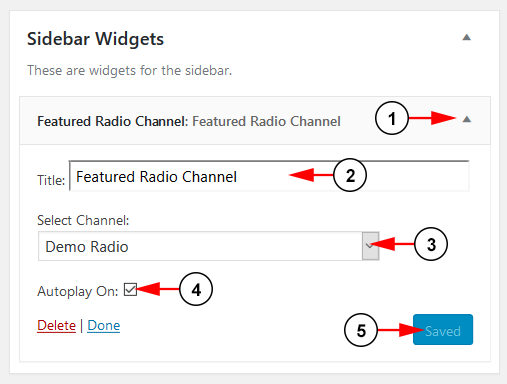
The Featured Radio Channel widget displays a selected radio channel on your site through the widget:
1. Click on the drop down to open the menu.
2. Here you can insert a title for your widget.
3. Choose from the drop down list the channel you want to display on your site.
4. Check this box to have your channel autoplay.
5. Click here to save the details.
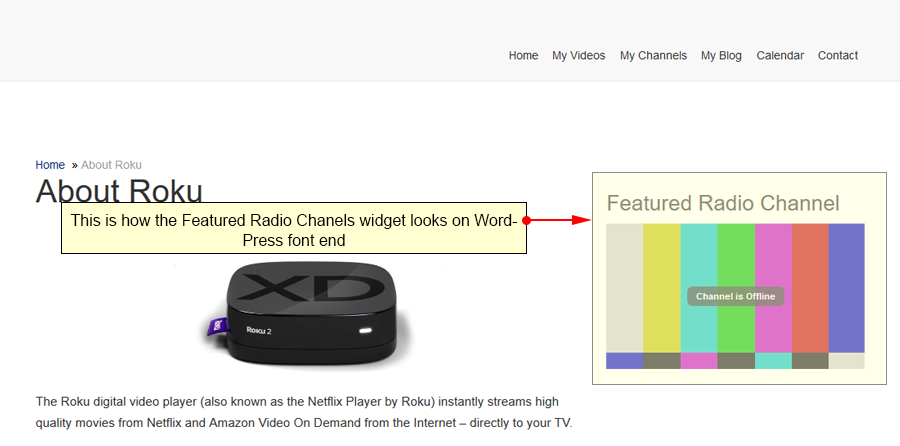
This is how the Featured Radio Channel widget is displayed on your site:
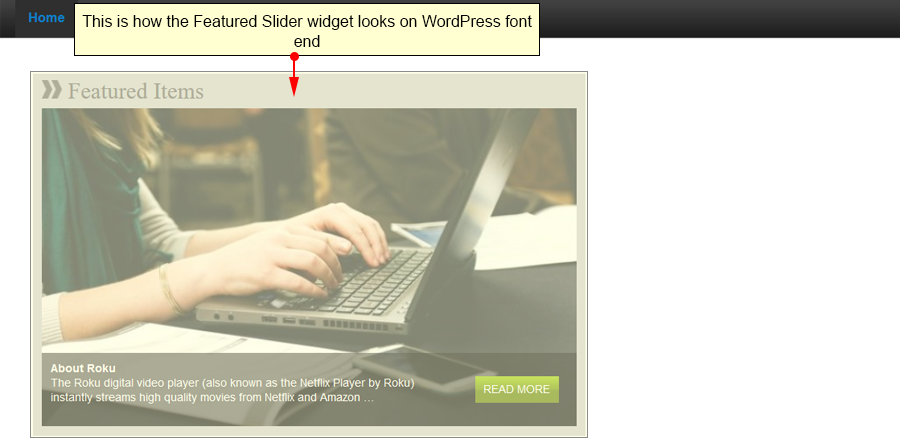
17. Featured Slider
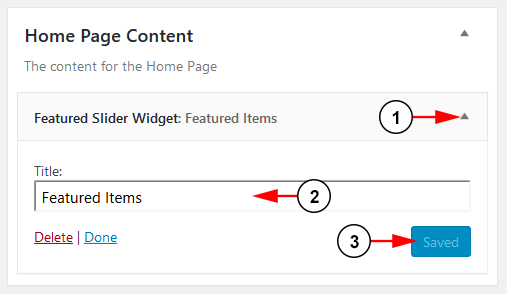
The Featured Slider widget displays a slider of featured posts and pages on your homepage:
1. Click on the drop down to open the menu.
2. Here you can insert a title for your widget.
3. Click here to save the details.
Note: This widget can only be used on the Home Page Content section.
This is how the Featured Slider widget is displayed on your site:
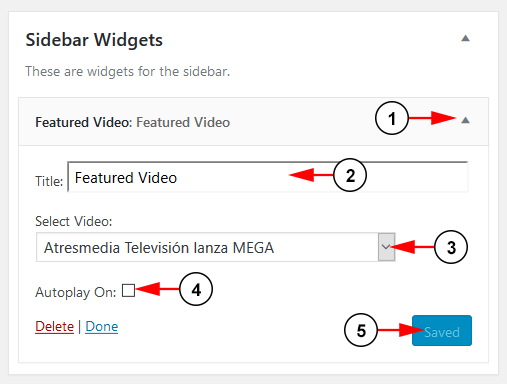
18. Featured Video
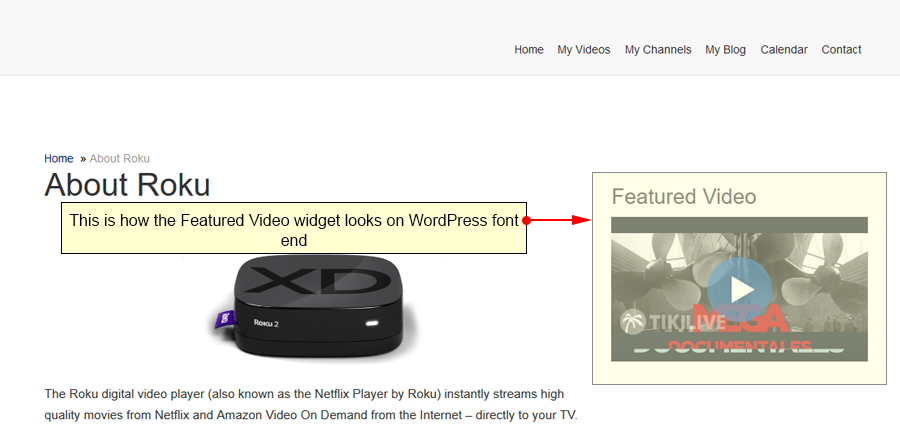
The Featured Video widget displays a selected video on your site through the widget:
1. Click on the drop down to open the menu.
2. Here you can insert a title for your widget.
3. Choose from the drop down list the video you want to display on your site.
4. Check this box to have your channel autoplay.
5. Click here to save the details.
This is how the Featured Video widget is displayed on your site:
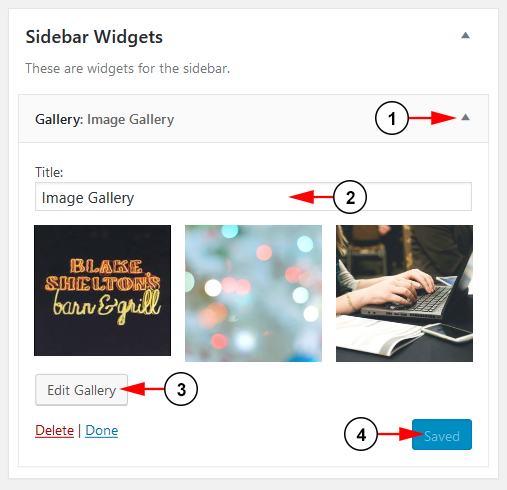
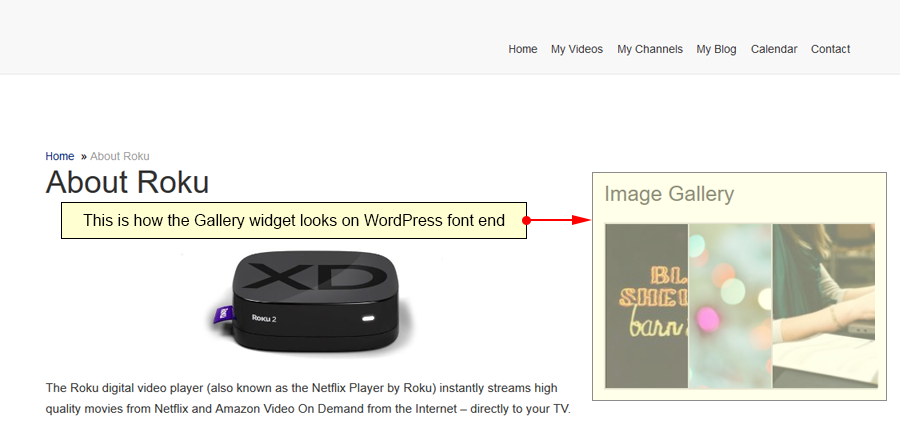
19. Gallery
The Gallery widget allows you to display an image gallery on your site through the widget:
1. Click on the drop down to open the menu.
2. Here you can insert a title for your widget.
3. Click the button here to edit the gallery images and settings.
5. Click here to save the details.
This is how the Gallery widget is displayed on your site:
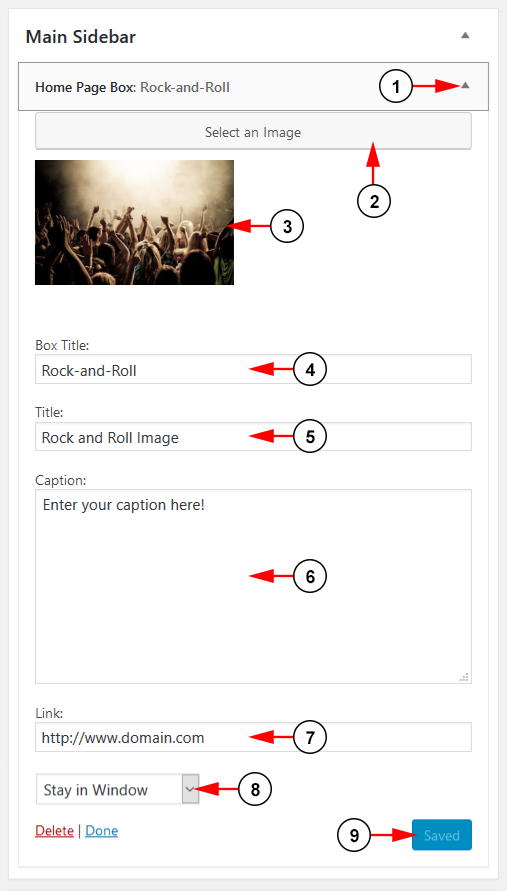
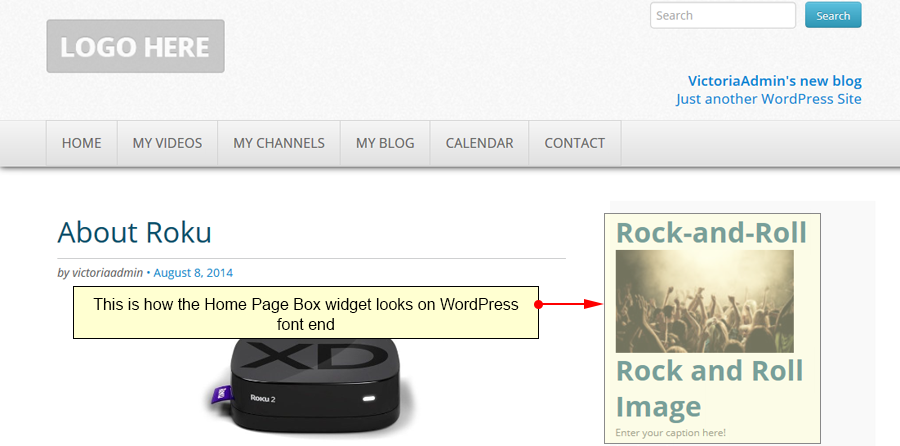
20. Home Page Box
The Home Page Box widget allows you to display a featured image on your site with additional information:
1. Click on the drop down to open the menu.
2. Click the button here to upload an image.
3. Here you can see a preview of the image.
4. Insert here a title for your box.
5. Insert here a title for your image.
6. Insert a caption for your image here:
7. Insert a link to read more here.
8. Choose there whether you want the link to open in the same window or a different one.
9. Click here to save the details.
This is how the Home Page Box widget is displayed on your site:
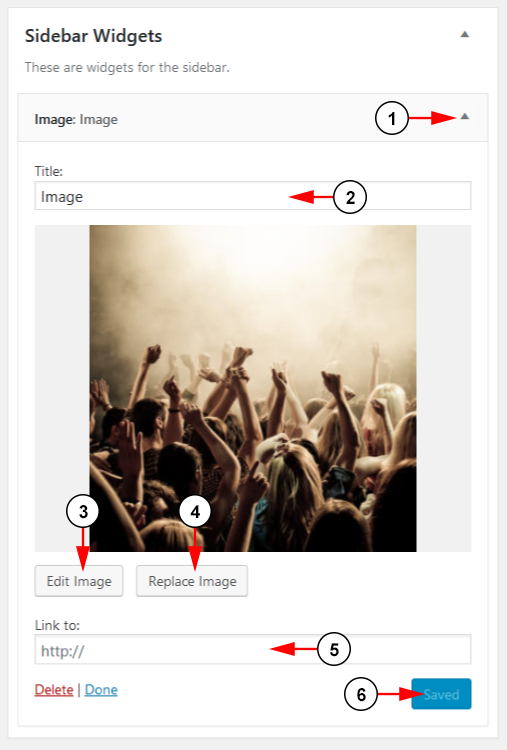
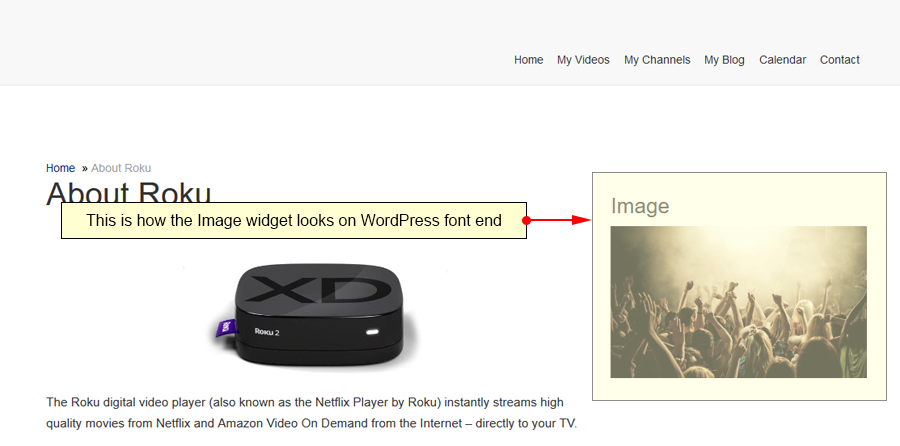
21. Image
The Image widget displays a single selected image on your site through the widget:
1. Click on the drop down to open the menu.
2. Here you can insert a title for your widget.
3. Click the button here to edit the image.
4. Click the button here to replace the image with a new one.
5. Insert here the URL you wish the image to link to.
6. Click here to save the details.
This is how the Image widget is displayed on your site:
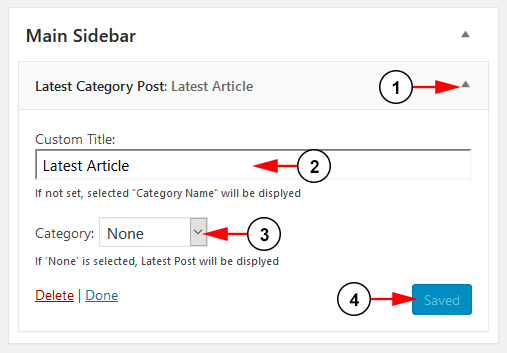
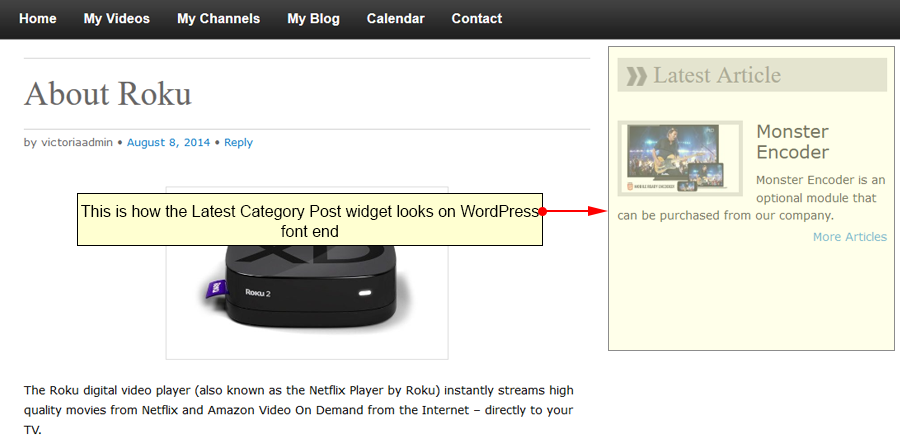
22. Latest Category Post
The Latest Category Post widget displays the latest post in a category on your site:
1. Click on the drop down to open the menu.
2. Here you can insert a title for your widget.
3. Select from the drop down the category you would like to use for the widget.
4. Click here to save the details.
This is how the Latest Category Post widget is displayed on your site:
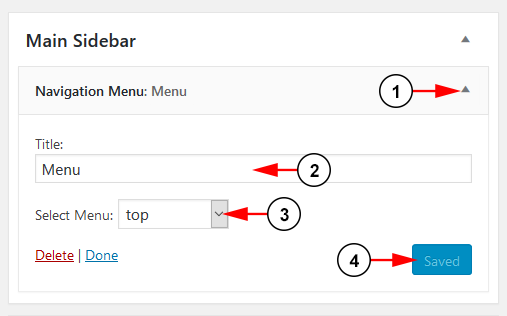
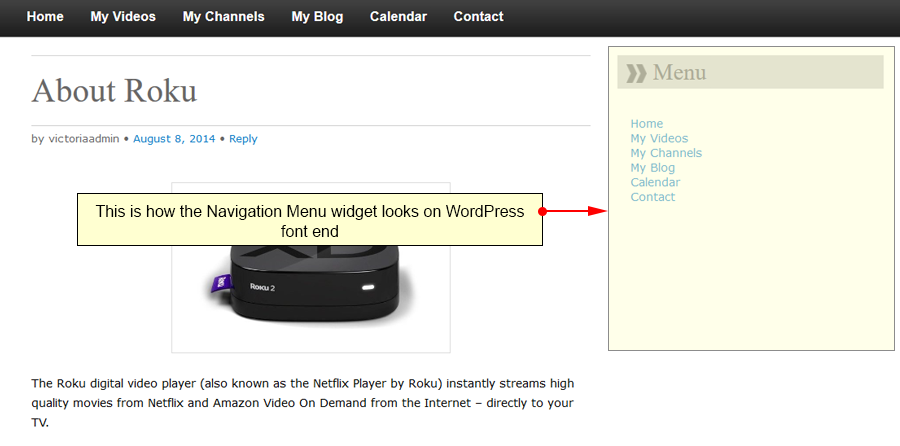
23. Navigation Menu
The Navigation Menu widget displays a selected menu from your site:
1. Click on the drop down to open the menu.
2. Here you can insert a title for your widget.
3. Select your menu from the drop down menu.
4. Click here to save the details.
This is how the Navigation Menu widget is displayed on your site:
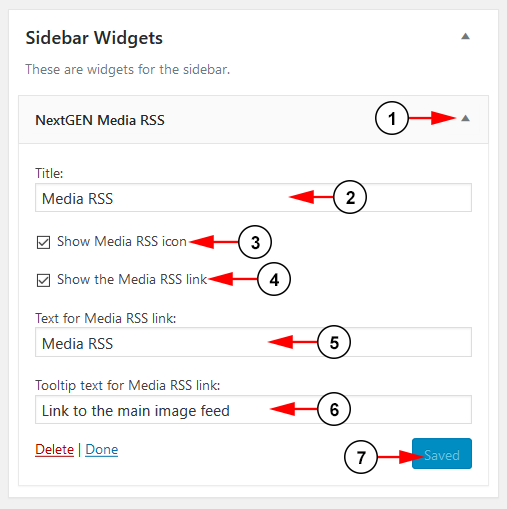
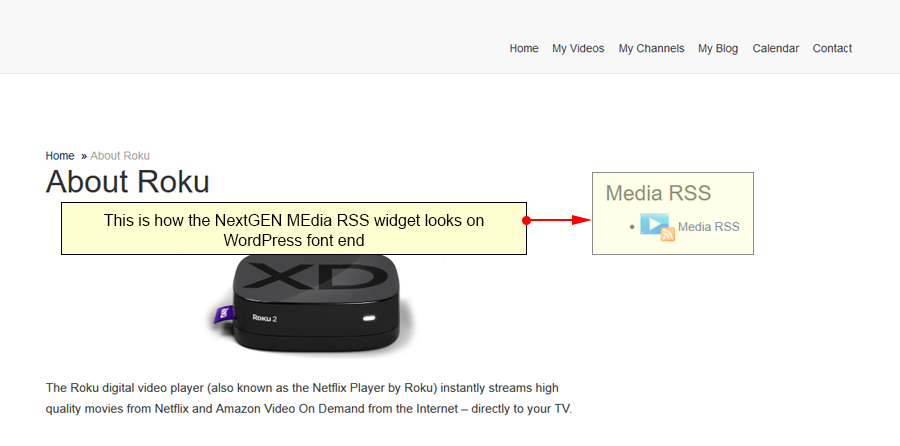
24. NextGEN Media RSS
The NextGEN Media RSS widget displays link to your media RSS on your site through the widget:
1. Click on the drop down to open the menu.
2. Here you can insert a title for your widget.
3. Check the box here to display the Media RSS icon.
4. Check the box here to display the Media RSS link.
5. Type here the text you want to be displayed for the link.
6. Type here the text to display when hovering over the link.
7. Click here to save the details.
This is how the NextGEN Media RSS widget is displayed on your site:
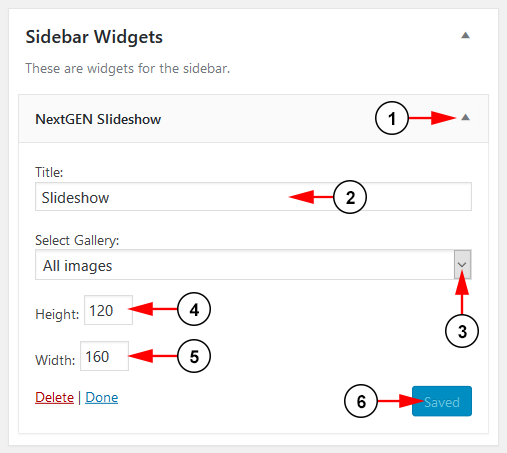
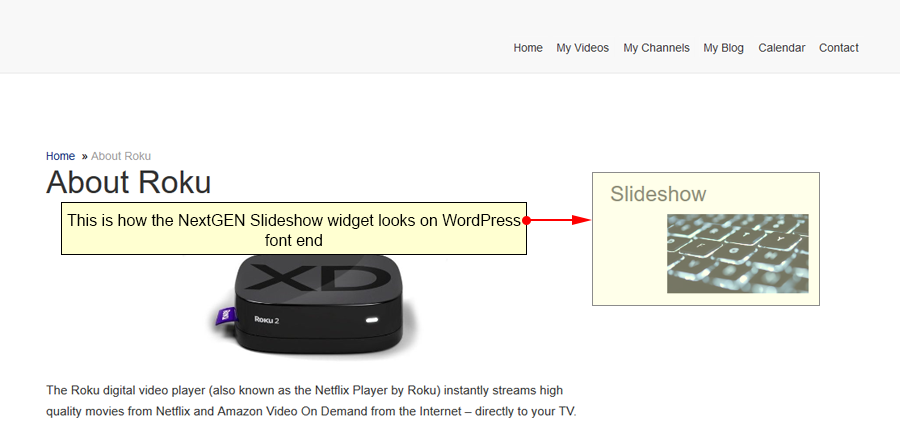
25. NextGEN Slideshow
The NextGEN Slideshow widget displays a slideshow of images from your galleries on your site through the widget:
1. Click on the drop down to open the menu.
2. Here you can insert a title for your widget.
3. Choose from the drop down list the gallery you want to use.
4. Adjust the height for the slideshow here.
5. Adjust the width for the slideshow here.
6. Click here to save the details.
This is how the NextGEN Slideshow widget is displayed on your site:
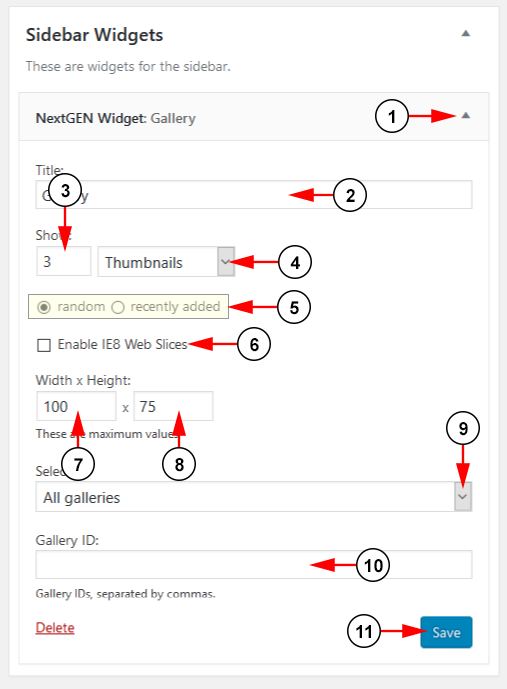
26. NextGEN
The NextGEN widget displays a gallery of images on your site through the widget:
1. Click on the drop down to open the menu.
2. Here you can insert a title for your widget.
3. Insert here the number of images to show.
4. Select from the drop down list how the images are displayed.
5. Select the order the images are shown.
6. Check the box here to enable IE8 Web Slices.
7. Insert here the max width for your images.
8. Insert here the max height for your images.
9. Select from the drop down how you want the images selected.
10. Input here the gallery ID to pull images from.
11. Click here to save the details.
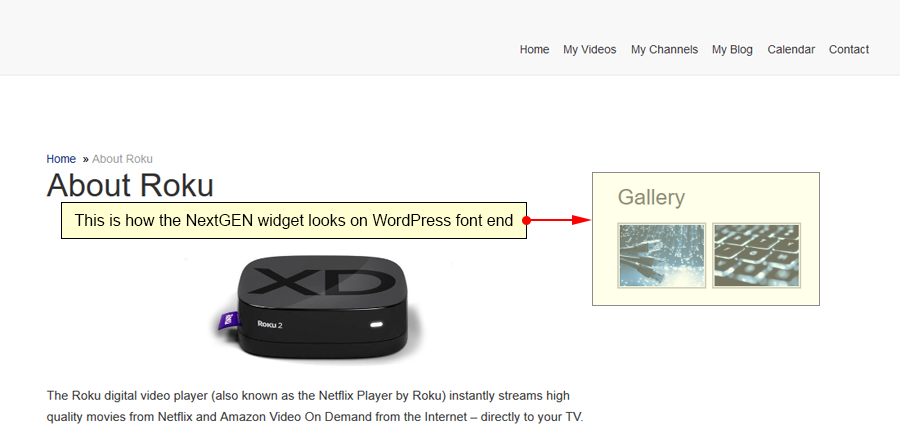
This is how the NextGEN widget is displayed on your site:
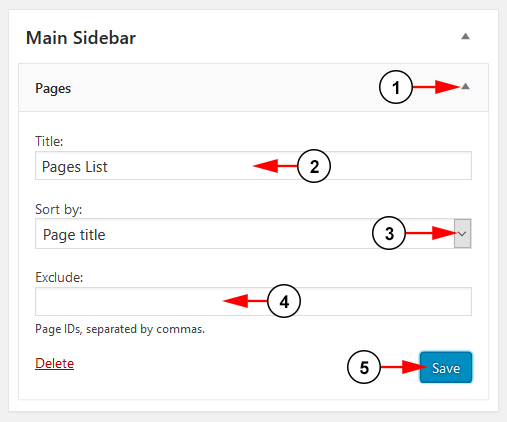
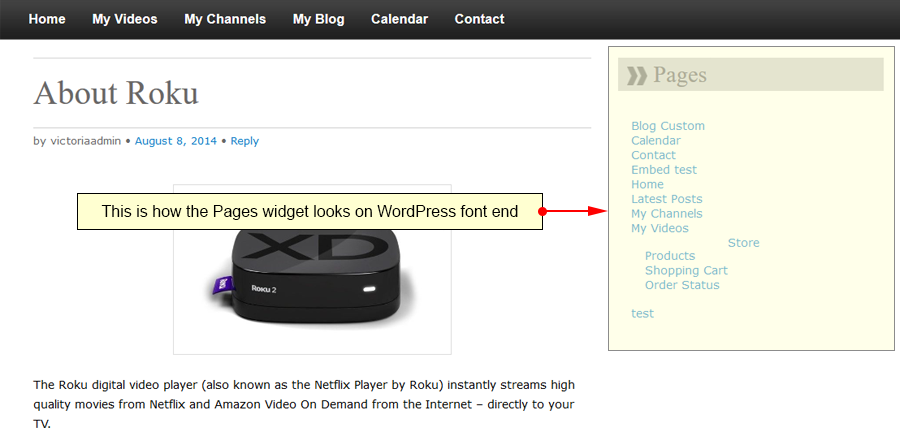
27. Pages
The Pages widget displays a list of your pages on your site:
1. Click on the drop down to open the menu.
2. Here you can insert a title for your widget.
3. Select from the drop down list how the pages are sorted.
4. Insert here any pages you would like to exclude.
5. Click here to save the details.
This is how the Pages widget is displayed on your site:
28. Product Categories
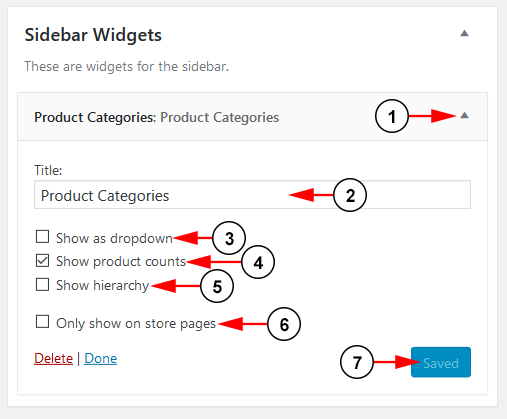
The Product Categories widget displays a list of your product categories on your site through the widget:
1. Click on the drop down to open the menu.
2. Here you can insert a title for your widget.
3. Click the box here to show the categories as a drop down.
4. Click the box here to show the product count for each category.
5. Click the box here to show hierarchy.
6. Click the box here to show product categories that are only listed on the store pages.
7. Click here to save the details.
This is how the Product Categories widget is displayed on your site:
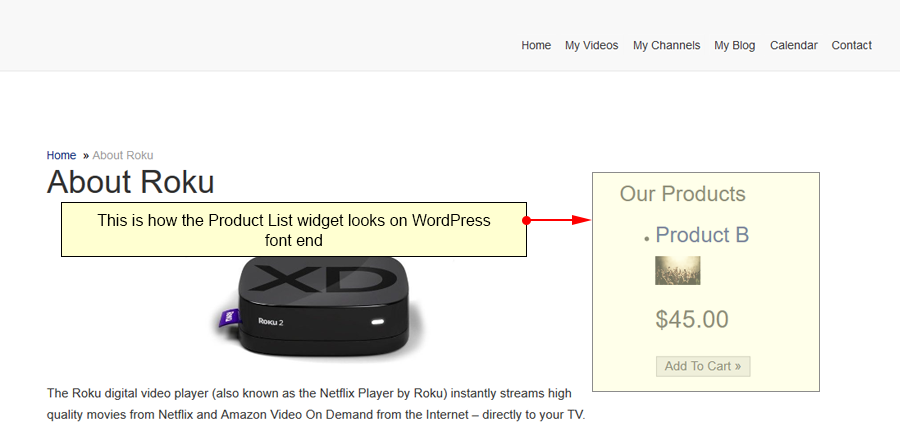
29. Product List
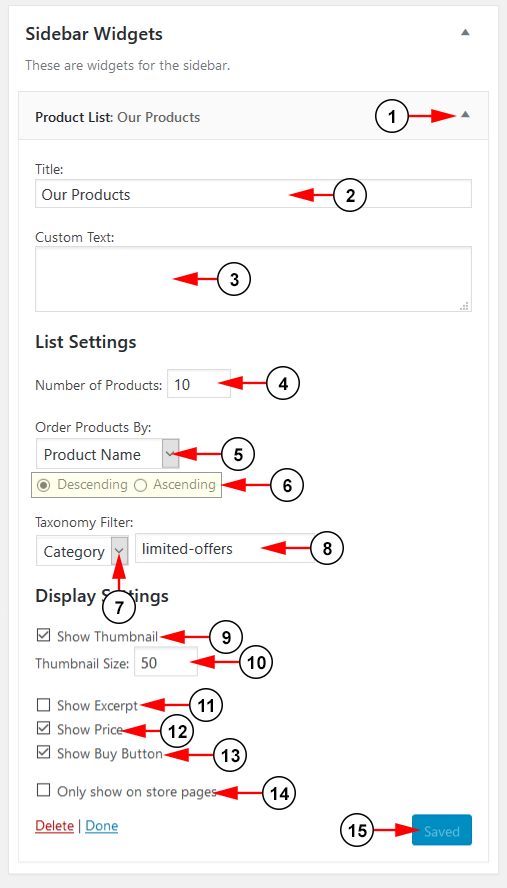
The Product List widget displays a list of your products on your site through the widget:
1. Click on the drop down to open the menu.
2. Here you can insert a title for your widget.
3. Insert here custom text to display on the widget.
4. Insert here the max number of products you want listed.
5. Select from the drop down list how you want the products listed.
6. Select from the drop down list how you want the products ordered.
7. Select here how you want your products filtered.
8. Type here the name to filter your products.
9. Select the box here if you want to display the product thumbnail.
10. Type here the thumbnail size.
11. Select the box here if you want to display the product excerpt.
12. Select the box here if you want to display the product price.
13. Select the box here if you want to display a button to purchase the product.
14. Select the box here if you only want to display products on the store pages.
15. Click here to save the details.
This is how the Product List widget is displayed on your site:
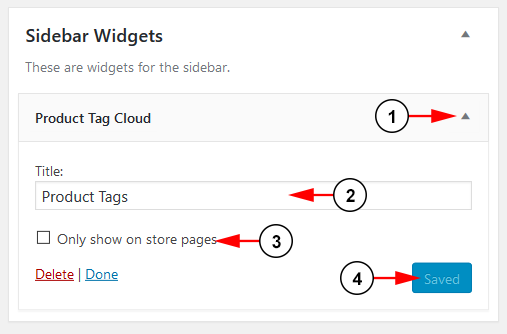
30. Product Tag Cloud
The Product Tag Cloud widget displays a series of tags on your site through the widget:
1. Click on the drop down to open the menu.
2. Here you can insert a title for your widget.
3. Check the box here to show only tags that are used on the store pages.
4. Click here to save the details.
This is how the Product Tag Cloud widget is displayed on your site:
Note: Larger sized tags are used more on products while smaller ones are used less.
31. Recent Comments
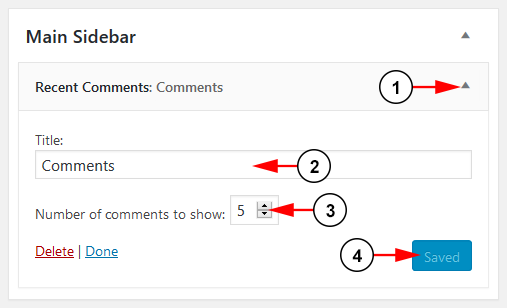
The Recent Comments widget displays the most recent comments made on your site:
1. Click on the drop down to open the menu.
2. Here you can insert a title for your widget.
3. Insert here the max number of comments to show.
4. Click here to save the details.
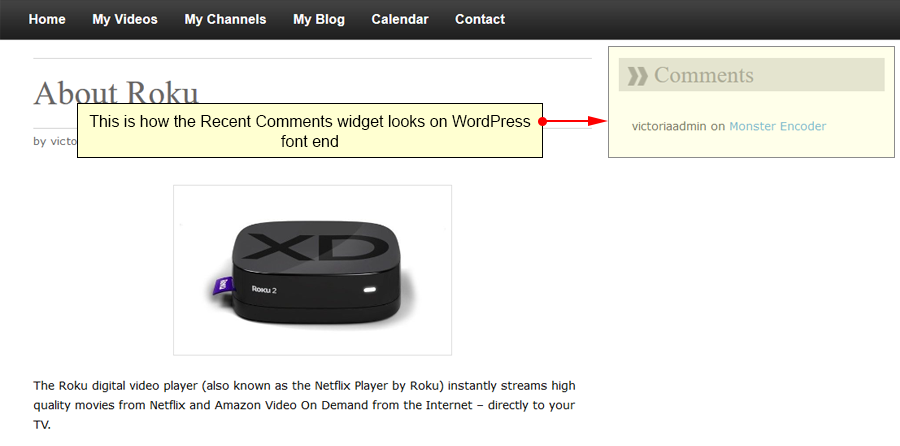
This is how the Recent Comments widget is displayed on your site:
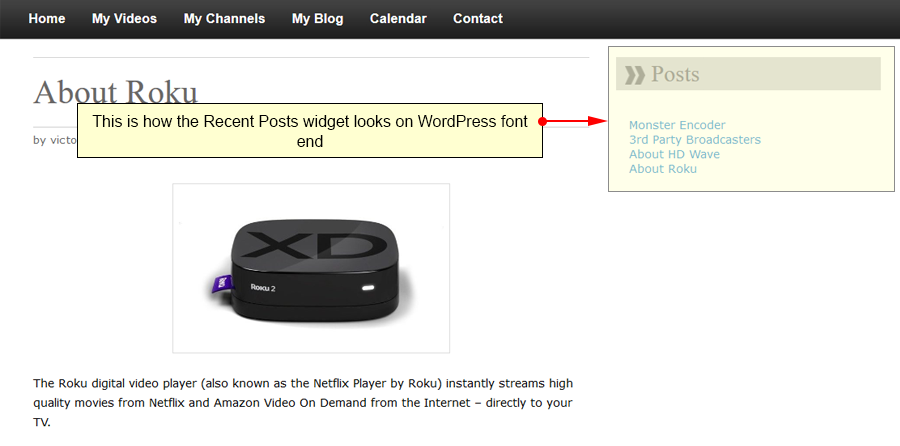
32. Recent Posts
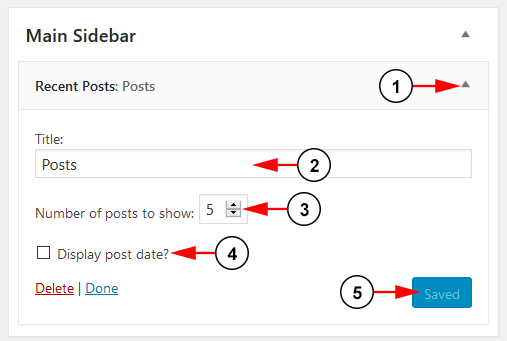
The Recent Posts widget displays the most recent posts made on your site:
1. Click on the drop down to open the menu.
2. Here you can insert a title for your widget.
3. Insert here the max number of posts show show.
4. Check the box here if you want to display the post date.
5. Click here to save the details.
This is how the Recent Posts widget is displayed on your site:
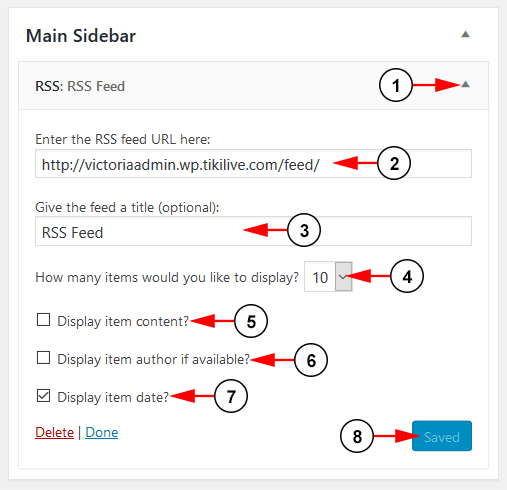
33. RSS Feed
The RSS Feed widget displays your RSS information on your site:
1. Click on the drop down to open the menu.
2. Insert here the RSS link for your site.
3. Insert here a title for your widget.
4. Select from the drop down the max number of items you would like to display.
5. Check the box here if you would like to display item content.
6. Check the box here if you would like to display the item author.
7. Check the box here if you would like to display the date the item was published.
8. Click here to save the details.
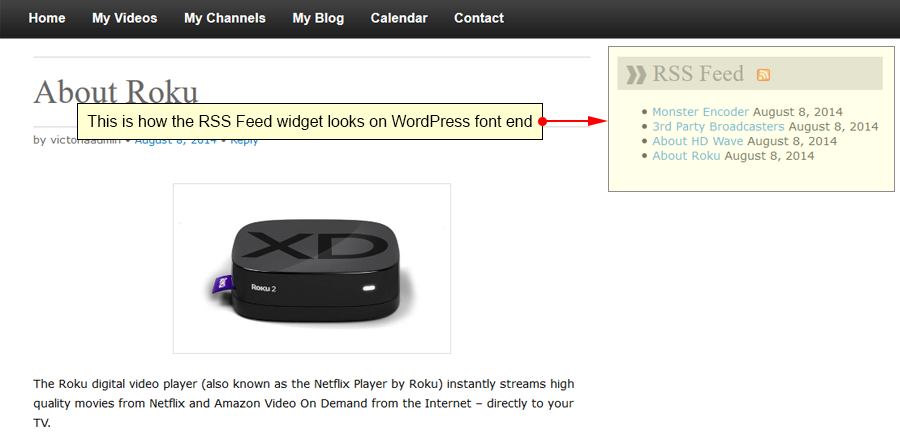
This is how the RSS Feed widget is displayed on your site:
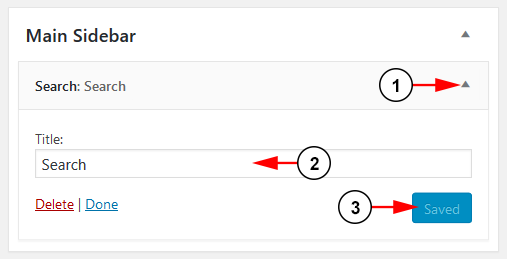
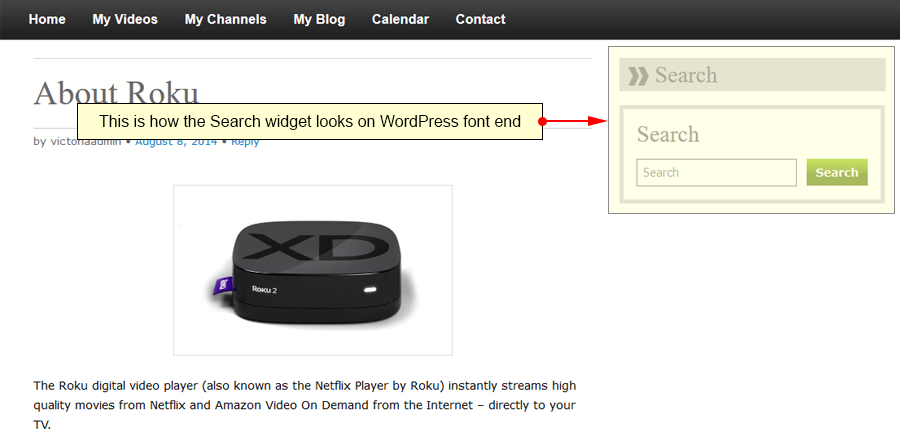
34. Search
The Search widget displays a search box on your site:
1. Click on the drop down to open the menu.
2. Here you can insert a title for your widget.
3. Click here to save the details.
This is how the Search widget is displayed on your site:
35. Shopping Cart
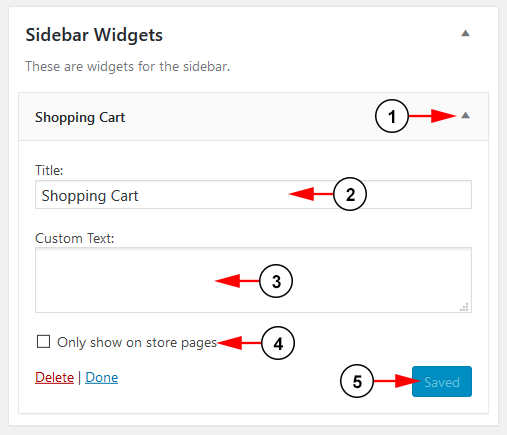
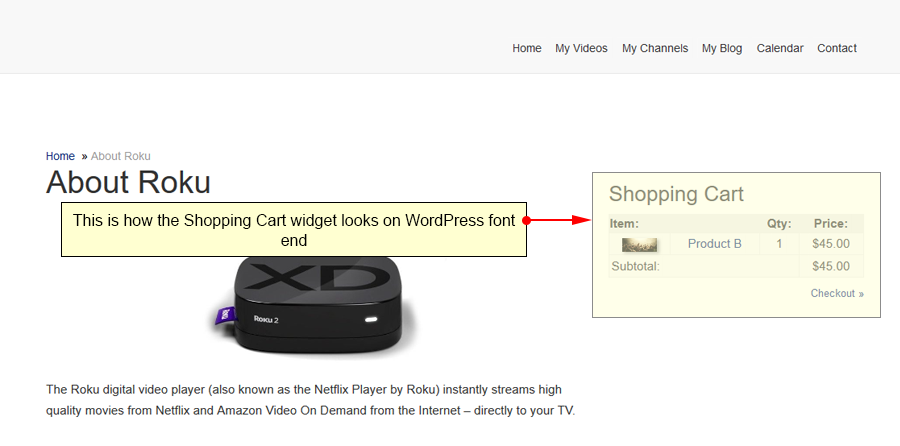
The Shopping Cart widget displays a shopping cart for users to view added products on your site through the widget:
1. Click on the drop down to open the menu.
2. Here you can insert a title for your widget.
3. Type here any text you want to display on the widget.
4. Check the box here to show items that are used on the store pages.
5. Click here to save the details.
This is how the Shopping Cart widget is displayed on your site:
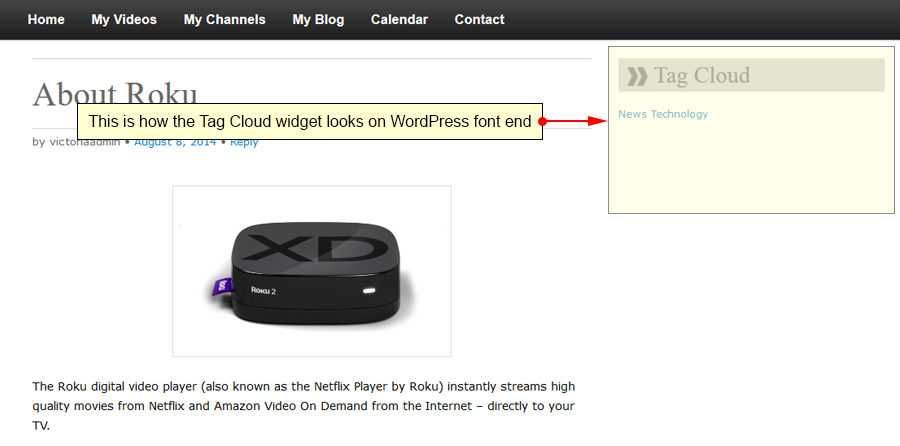
36. Tag Cloud
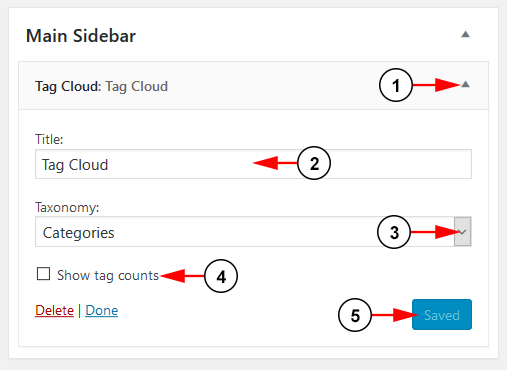
The Tag Cloud widget displays a collection of tags on your site:
1. Click on the drop down to open the menu.
2. Here you can insert a title for your widget.
3. Select from the drop down list the group you would like display.
4. Check the box here to display a tag count.
5. Click here to save the details.
This is how the Tag Cloud widget is displayed on your site:
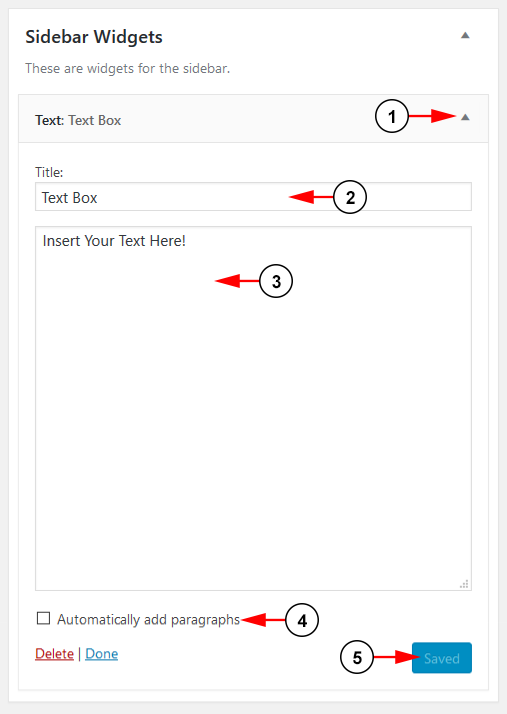
37. Text
The Text widget displays set text on your site through the widget:
1. Click on the drop down to open the menu.
2. Here you can insert a title for your widget.
3. Insert the text here that you want to display on your site.
4. Click the box here to automatically add paragraphs to your text.
5. Click here to save the details.
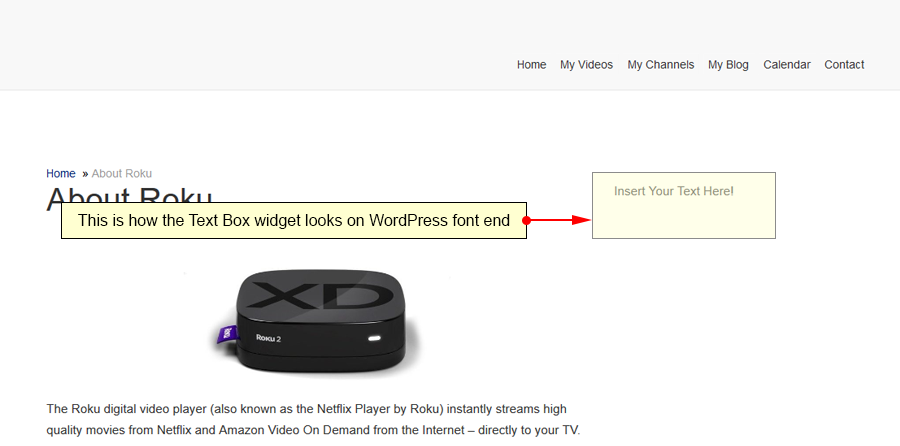
This is how the Text widget is displayed on your site:
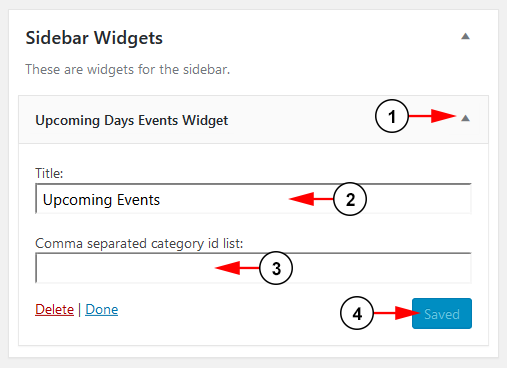
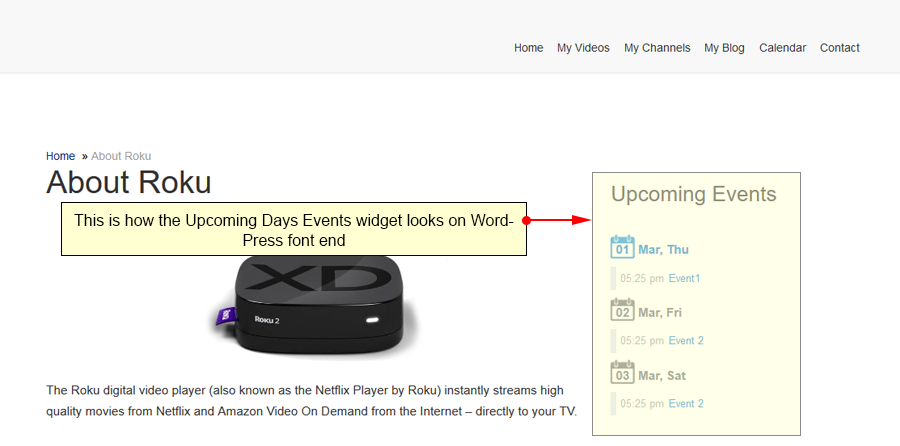
38. Upcoming Days Events
The Upcoming Days Events widget displays a slideshow if images from your galleries on your site through the widget:
1. Click on the drop down to open the menu.
2. Here you can insert a title for your widget.
3. Type category IDs to list specific events here.
4. Click here to save the details.
This is how the Upcoming Days Events widget is displayed on your site:
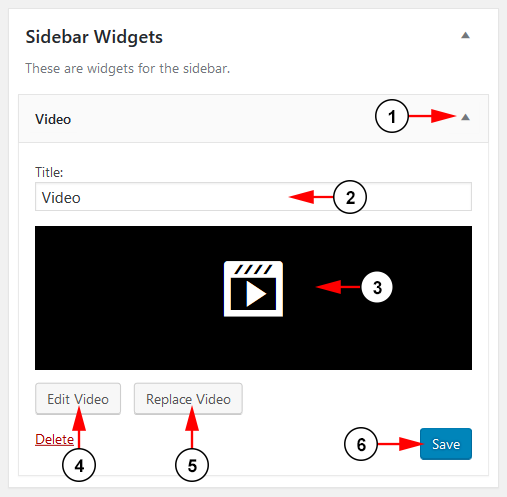
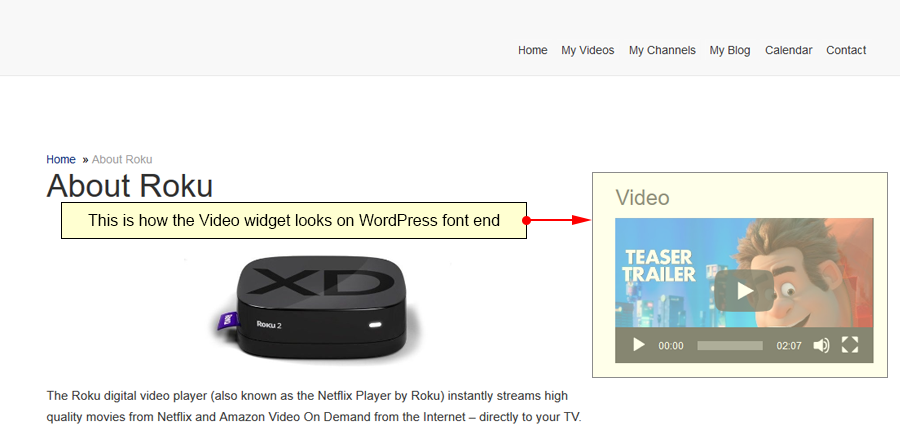
39. Video
The Video widget displays a slideshow if images from your galleries on your site through the widget:
1. Click on the drop down to open the menu.
2. Here you can insert a title for your widget.
3. Click here to view the video you have uploaded.
4. Click the button here to edit the video.
5. Click the button here to replace the video.
6. Click here to save the details.
This is how the Video widget is displayed on your site:
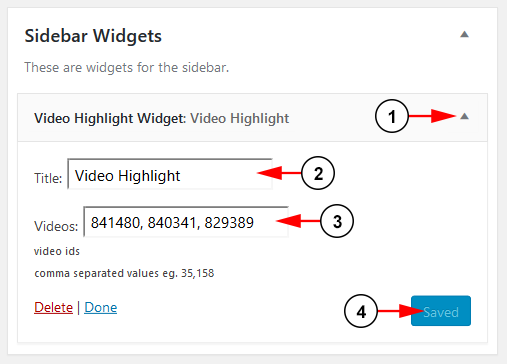
40. Video Highlight Widget
The Video Highlight Widget widget displays a slideshow if images from your galleries on your site through the widget:
1. Click on the drop down to open the menu.
2. Here you can insert a title for your widget.
3. Insert here the ID for the videos you want to display.
Note: These can be found in the edit section of your videos or at the end of the video URL.
4. Click here to save the details.
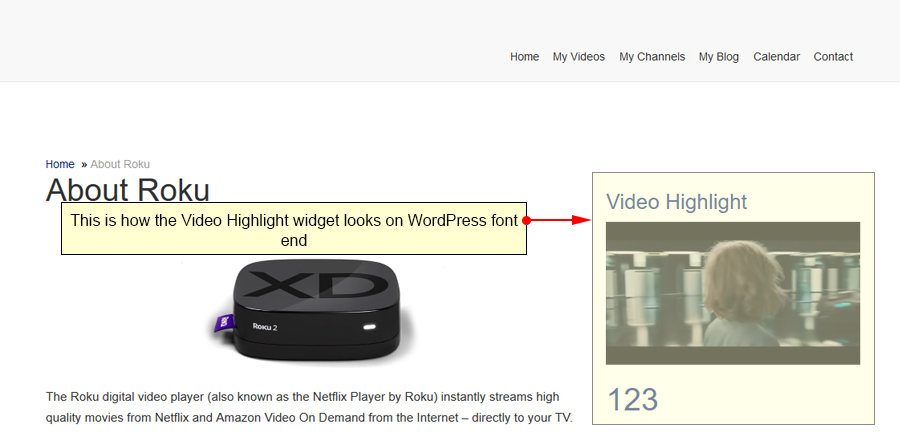
This is how the Video Highlight Widget widget is displayed on your site:
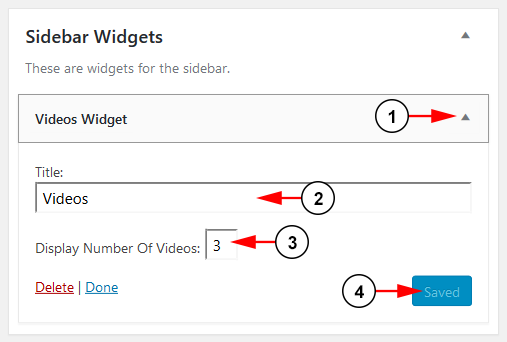
41. Videos
The Videos widget displays a slideshow if images from your galleries on your site through the widget:
1. Click on the drop down to open the menu.
2. Here you can insert a title for your widget.
3. Insert here the maximum number of videos to display.
4. Click here to save the details.
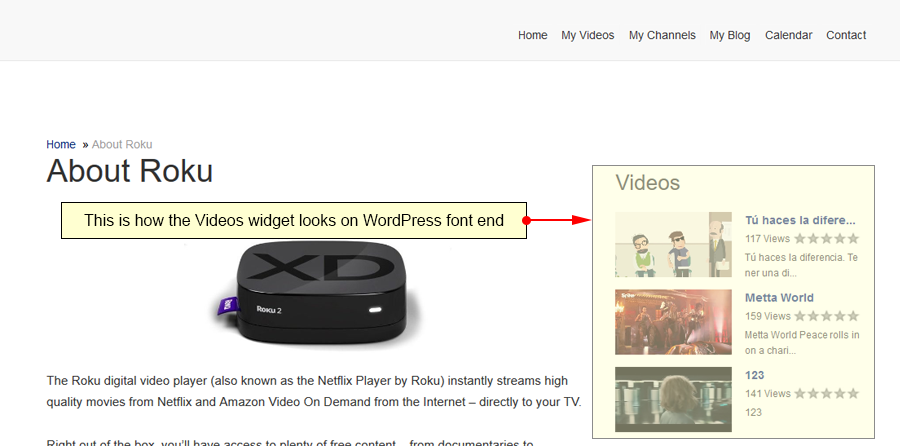
This is how the Videos widget is displayed on your site:
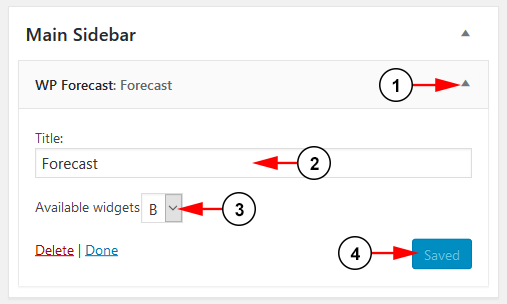
42. WP Forecast
The WP Forecast widget displays the weather forecast on your site:
1. Click on the drop down to open the menu.
2. Here you can insert a title for your widget.
3. Choose from the drop down menu from the available widgets.
4. Click here to save the details.
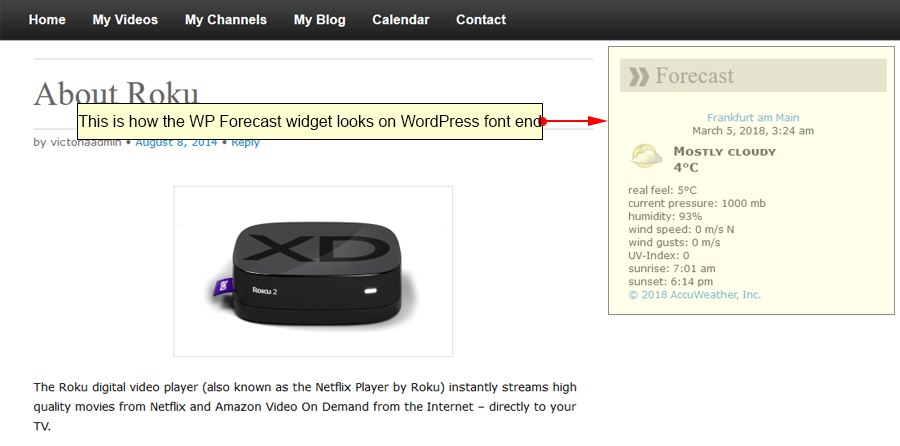
This is how the WP Forecast widget is displayed on your site:

